Build plan: assembling node 1
Building one? The step-by-step plan, in plain language with instructions for an AI agent at every step, is at life.oncra.org/node.
The kit is designed and ordered. Nothing has been built and nothing has been measured. This page is the order of work, written so that someone who is not us can follow it, because that is the point of publishing it.
Two definitions of done, in sequence: a node on a bench with a meter on it, then a node on a post. The first one is where the design is allowed to be wrong. The second one is where it is not.
Five stages. Each ends in a gate that is a number or a verified fact, not a judgement. Any stage can send you back one stage. None can be skipped, and in particular the box is not closed before the electronics have run open.
| Stage | Produces | Gate |
|---|---|---|
| 0. Before the parcels | tokens, a golden image, the missing orders | a synthetic reading visible on a bench place |
| 1. Bench electronics | probes, mic and modem working loose on a desk | one detection and two soil rows over LTE, and a measured draw |
| 2. Power chain | battery, MPPT, scheduler | three unattended boot-work-shutdown cycles, and Wh/day measured |
| 3. The box | a sealed, painted, coated enclosure | a closed box completes a cycle, and no water after a hose test |
| 4. The post | a node in a field | lastSeenAt moves, and a dawn chorus arrives the next morning |
| 5. Soak | confidence | fourteen days with no intervention |
Fill in kit/bench-log.csv as you go. It carries the modelled value for every number next to an empty column for the measured one. A modelled number with nothing beside it is the thing this whole exercise exists to remove.
Stage 0. Before the parcels
None of this needs hardware, so none of it is an excuse to wait.
0.1 Register a bench place and mint three device tokens. Use a throwaway place so that field data starts clean later. A place is a GeoJSON polygon; a 20 m square round the desk is enough.
curl -s -XPOST https://life.oncra.org/api/v1/places -H "authorization: Bearer $LIFE_ADMIN_KEY" \
  -H 'content-type: application/json' \
  -d '{"name":"Bench, Tolhuisweg","public":false,"country":"NL","landUse":"bench",
       "geometry":{"type":"Polygon","coordinates":[[[4.9012,52.3836],[4.9016,52.3836],[4.9016,52.3839],[4.9012,52.3839],[4.9012,52.3836]]]}}'

for d in '{"kind":"SOUND","model":"Life node v1, BirdNET-Go on Raspberry Pi 4, INMP441","heightM":0.5}' \
         '{"kind":"SOIL","model":"DFRobot SEN0600","depthCm":10}' \
         '{"kind":"SOIL","model":"DFRobot SEN0600","depthCm":30}'; do
  curl -s -XPOST https://life.oncra.org/api/v1/places/bench-tolhuisweg/devices \
    -H "authorization: Bearer $LIFE_ADMIN_KEY" -H 'content-type: application/json' -d "$d"
done
Each call returns a deviceToken (lo_dev_...) once. Write all three into a password manager before closing the terminal. They become LIFE_DEVICE_TOKEN, LIFE_DEVICE_TOKEN_SOIL_1 and LIFE_DEVICE_TOKEN_SOIL_2 in /etc/life-node.env.
0.2 Prove the chain with synthetic rows. Post one soil row and one detection by hand, then read them back. This separates "the server works" from "the node works", which otherwise get debugged as one problem at two in the morning.
curl -s -XPOST https://life.oncra.org/api/v1/ingest/soil -H "authorization: Bearer $TOK_SOIL_1" \
  -H 'content-type: application/json' \
  -d '{"readings":[{"ts":"2026-09-19T12:00:00Z","vwc":24.1,"tempC":15.3}]}'
curl -s https://life.oncra.org/api/v1/places/bench-tolhuisweg/devices | jq '.items[] | {kind, depthCm, lastSeenAt}'
Gate: lastSeenAt is populated on the device you posted as, and only that one.
0.3 Order what is still missing, in this order of urgency: the 1NCE SIM (nothing over LTE works without it and the earlier signup was never completed), the generic list from basket G (USB meter, fuse, paint, membrane, tape, plastic sheet, foam and hood), and the post from a builders' merchant. The panel (Victron 40 W, Dekker Watersport, bought 10 October) and the battery (Green Cell 10 Ah) are in, and neither is on the critical path: stages 0 and 1 run off a USB supply.
0.4 Build the golden image. node/image/build.sh takes a stock Raspberry Pi OS Lite 64-bit image, the BirdNET-Go arm64 release and the Witty Pi 4 software, and produces a 12 GiB image on any Linux workstation (the arm64 root is entered through qemu-user-static). Nothing per-node is inside it. The layout is in node/image/README.md; three things have to be right in the image or they are wrong in every node built from it afterwards:
- Audio clip saving off.
build.shruns BirdNET-Go once to write its default config, then setsrealtime.audio.export.enabled: false. Detections leave the node, sound does not. It is a promise to the landowner and it is what keeps a 500 MB SIM alive for ten years. - All node state on a writable partition. Root is a read-only tmpfs overlay from the first boot, which is what protects the card from power cuts; a third partition,
/data, grows to fill the card at the first boot and carries BirdNET-Go's database and config, the soil queue, the push cursor, the Witty Pi schedule, the journal, the SSH host keys and the network connections. Nothing the node must remember lives on root. - Per-node settings ride in on the boot partition.
life-node.env(three tokens, hostname, coordinates,SCHEDULE=benchand a WiFi for the desk) is copied onto the FAT partition from any laptop after flashing; the first boot moves it to/dataand off the boot partition. The 4G APN is set once in the modem's own web UI athttp://192.168.8.1.
Gate: the card boots, systemctl list-timers shows life-soil.timer and life-sound.timer, and a reboot does not lose a file written to the state partition.
Stage 1. Bench electronics, nothing in a box
Everything loose on a desk, powered from a USB supply through the inline meter. No enclosure, no battery, no MPPT. One thing added at a time, and a line in the log after each.
1.1 Inventory against the order list. Three lines from reichelt, one from UUGear, one from TelecomShop (all delivered), then the Opencircuit parcel (Pi, RS485 adapter, card, header), the DigiKey parcel (three probes) and the Amazon.nl small parts. Check the SEN0600 leads against DFRobot's colour code: brown VCC (5 to 30 V), black GND, yellow RS485-A, blue RS485-B. A lead with other colours gets metered before power.
1.2 Measure the Pi alone. This is the most important half hour of the build, because every energy number on the kit page rests on the phrase "about 5 W while awake" and nobody has measured it. Record: idle at the prompt, boot peak, and steady state with BirdNET-Go running. If the awake figure comes in above about 6.5 W, the summer margin is gone and either the schedule or the panel changes, so record it before buying anything else.
1.3 Re-address the probes. Both leave the factory on Modbus address 1, so on one bus they collide and neither answers. With one probe connected:
life-soil-agent --scan                      # who answers, and with what
life-soil-agent --set-address 2 --addr 1    # write register 0x07D0
life-soil-agent --scan                      # confirm, then connect both
--scan prints the raw registers as well as the decoded values. That is deliberate: the sen0600 profile was written from a datasheet and has never seen a probe, so the raw words are the evidence that the register map is right. Moisture should read a plausible percentage and temperature a plausible room temperature. Air is near zero, a glass of water is near saturation, and a hand around the prongs moves the temperature within a minute. If the decoded values are nonsense but the raw words are stable, the map is wrong and not the probe.
Both probes share one USB-to-RS485 adapter, because RS485 is a bus, and the order is what makes that work. Pi off for every wiring change. Step 1, one probe alone, one wire per terminal: brown to + and black to − of the USB screw terminal (marked S, +, D−, D+, −; on some, VCC and GND), yellow to A+ and blue to B− of the adapter; the adapter's GND and the terminal's S, D− and D+ stay empty. S is the cable shield: a probe wired to it gets no power and nothing answers, at any baud rate. Write address 2, power-cycle the probe if the scan still shows 1, and tape the lead "30 cm, address 2". Step 2, the second probe joins the first on the same four terminals, same colour with same colour, each pair crimped into one ferrule a size up. Swapped yellow and blue break nothing, but nothing answers. No termination resistor is needed on 2 m leads at 9600 baud. Address 1 (untaped) is the 10 cm probe, address 2 the 30 cm one, matching SOIL_1 and SOIL_2 in life-node.env. The diagram and the numbered steps are in the build guide.
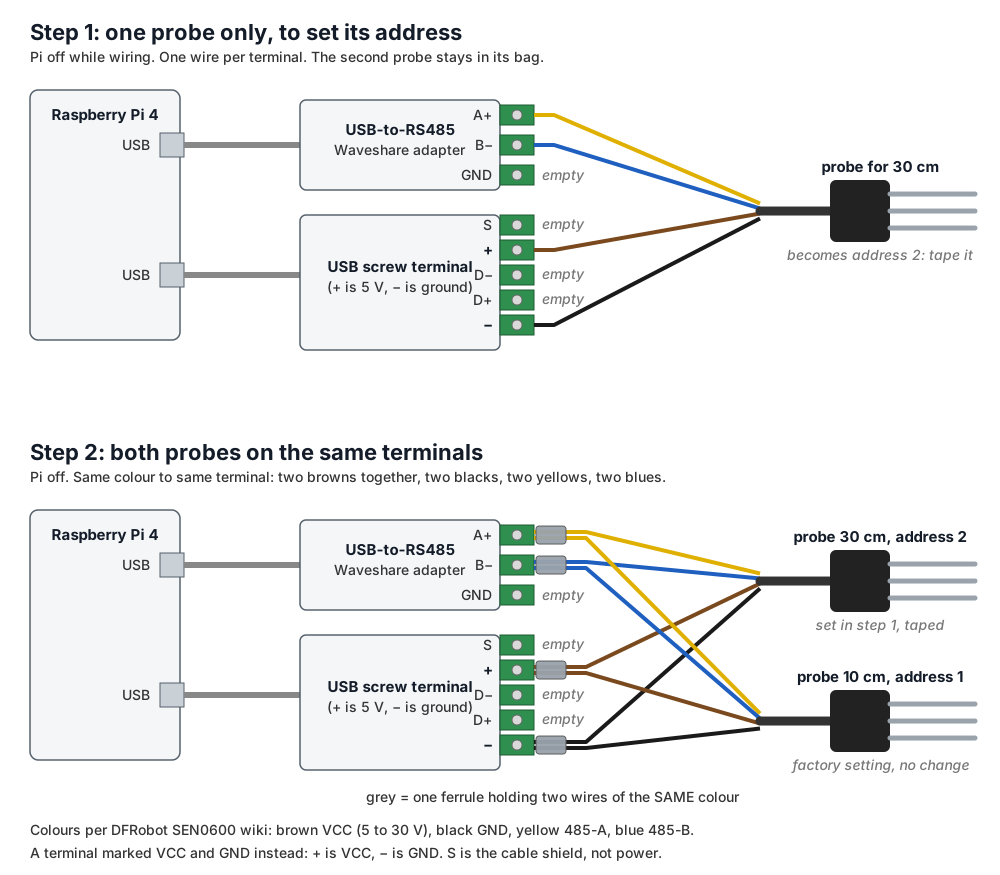
1.4 First real soil reading. Both probes on the bus, addresses 1 and 2, PROBE_PROFILE=sen0600, tokens in place. Run the agent once by hand, then let the timer do it. Watch both devices' lastSeenAt move on the bench place.
1.5 Microphone. Stacking header first so the I2S pins stay reachable once the Witty Pi is on. Wire the INMP441 to pins 18, 19 and 20 with a short lead, check the level with arecord, then let BirdNET-Go listen. Play a known bird call from a phone speaker: a confident detection of the right species is the gate. An empty room with a hissing microphone means a wiring or gain problem, not a quiet room.
1.6 Modem and SIM. Stick in, APN in its web UI, then a full cycle over LTE with WiFi and ethernet disabled, which is the only way to be sure you are not testing the desk network. Record the bytes: the SIM budget assumes hourly batched posts, and the earlier arithmetic showed that at ten and twenty minute intervals the TLS handshakes alone would eat a ten-year SIM in three and a half years. Then life-heartbeat --json on the node: it must print the stick's PLMN and cell id, and after the next push the bench place shows a heartbeat time on the SOUND device. That first cell becomes the node's home; carry the bench to another cell and the oracle must raise moved.
Gate for stage 1: both probes answer on their own addresses, one detection and two soil rows arrived at the bench place over LTE, and the awake draw is a number in the log.
Stage 2. The power chain
2.1 Assemble in this order, battery last: MPPT to Witty Pi on the load output, Witty Pi to Pi through the GPIO header, probes on 5 V from the USB breakout so that they switch with the Pi, then the fused battery lead. The 15 A inline fuse goes within a hand's width of the battery post and is not optional. The panel can stay on the windowsill for now; a 100 W panel indoors in September behaves like a 10 W panel outdoors, which is a fine way to test a charge controller.
2.2 Schedule. Set the Witty Pi for a short cycle first, say awake fifteen minutes in every hour, so that a day of testing gives a dozen cycles instead of one. Confirm that life-flush.service actually runs before shutdown and that the queue is empty afterwards. Only then set the real seasonal schedule: about ten hours a day March to October, one hour a day November to February, at a fixed clock time so the winter sample does not wander around the daily cycle.
2.3 Brown-out and recovery. Pull the supply mid-cycle, three times. The node must come back on its own with no card corruption and no lost queue. Coming back on its own depends on the Witty Pi's default ON setting, which the image sets at every boot (life-wittypi); from the factory the board waits for a press on its K1 button. This is the single most likely field failure and it is trivial to test on a desk.
2.4 Twenty-four hours unattended, with the meter logging. Compare against the modelled 54.6 Wh/day summer and 9.6 Wh/day winter, including the roughly 4.6 Wh/day parasitic floor from the charge controller's own consumption. A measurement more than about 20 percent above the model means the kit page's energy section is wrong and gets corrected, not explained.
Gate: three unattended cycles completed, and a measured Wh/day in the log.
Stage 3. The box
3.0 Regenerate the drawings first. All three SVGs still assume a 1010 by 540 panel. Node 1's panel is the Victron 40 W, smaller than that, so measure it and put its real size into the scripts: the bracket spacing and the sail area on paper are both wrong until then. Fix kit/draw-low-mount.py, kit/draw-wiring.py and kit/draw-energy.py and re-run them. Do not hand-edit an SVG, and do not drill against an out of date drawing.
3.1 Paint the enclosure before anything goes in it. The reichelt box is ABS, which is not UV-stable: outdoors it chalks and goes brittle in two to five years. Matt green outdoor paint for plastic, plastic primer unless the can says it bonds to ABS. UV protection first, camouflage second.
3.2 Lay it out on the 3 mm plastic sheet, not on the galvanised plate the box ships with. Steel next to a 4G stick detunes its antenna, and the whole point of this design is that the radio works through the wall. Nylon spacers, nothing metal near the modem. The battery lies flat and takes 55 percent of the floor with 43 mm of headroom above it, so the layout is decided by the battery and everything else fits around it.
3.3 The microphone port. A 5 mm hole, the ePTFE acoustic membrane over it on the inside, and the INMP441 gasketed against the wall. It is a bottom-port MEMS part: an air gap between the port and the wall turns into a resonant cavity and the detections get worse in a way that looks like a bad microphone. A small rigid hood over the outside with the foam inside it and the opening pointing down: a flush port in a flat wall turns wind into turbulence straight onto the membrane, and bare foam crumbles in a season of UV.
3.4 Glands. Five M20: panel lead, two probe leads, one vented gland at the lowest point, one spare blanked. Every gland points down. The panel's MC4 connectors get cut off, ferruled and taken straight into the MPPT, because the run is about 300 mm.
3.5 Conformal coat the Pi, the RS485 adapter and the microphone board, and mask the microphone port and the connectors before spraying. Coating replaces silica gel, which works for one season and then nobody regenerates it.
3.6 Dry test, then wet test. Closed box, full cycle, record the 4G signal strength from inside with the lid on: that number decides whether the internal antenna idea survives or whether the pigtail and whip get bought after all. Then five minutes with a garden hose from every angle, open it, look for water. Only then re-measure the draw with the lid on, because a closed painted box in the sun is a thermal question and a warm Pi is a thirstier Pi.
3.7 The guard. Build node/firmware/life-guard on the perfboard (pinout in its README), stack it on the Witty Pi's extension header, flash it from the Pi with flash.sh, set GUARD=1 in the env. Reed in the lid with its magnet opposite; reed on the panel bracket, magnet on the frame; tilt switch upright on the plate. Then the four tests, in this order, with the siren wired last: (1) life-guard status reads armed with the lid closed and names the right loop with each contact opened in turn; (2) lid open with no window: chirps, the Pi boots, the bench place shows a TAMPER alert with loop lid inside a minute, siren at sixty seconds; (3) PUT .../maintenance {"hours": 1} on the oracle, lid open: chirps, then the LED goes green and it stops; (4) window set, lid closed, wait for the hourly heartbeat, open: no chirp at all. Record the seconds from lid to green in the log. That number is what the farmer will live with.
Gate: a closed box completes a cycle, the signal strength is written down, the inside is dry, and the guard passes its four tests.
Stage 4. The post
4.1 Post. Two metre pressure-treated class 4 timber, driven 800 mm into the ground, box mounted at 500 mm. The panel is a half square metre sail: roughly 170 N at 25 m/s and about 155 Nm of overturning moment, which is why the post is not shorter and why the panel brackets are bolted through the timber with M8 rather than held by hose clamps, which loosen as timber shrinks.
4.2 Probes, 1.5 m south of the post, on their own 2 m leads, which is why there is no extension cable, no junction box and no earth rod. South because the panel's shadow always falls north. Dig wider than 20 cm, insert the prongs horizontally into the undisturbed side wall at 10 cm and 30 cm, never hammer, backfill in layer order and firm to natural density. Air gaps read low for months. Then wait 24 to 48 hours before trusting a number.
4.3 Register the real place and its three devices, swap the tokens in /etc/life-node.env, and watch the first upload arrive. Note the position to a metre and mark it, so that machinery misses the probes and a person can find them in five years.
Gate: lastSeenAt moves within one interval on all three devices, and the next morning's dawn chorus shows up as detections.
Stage 5. Soak, fourteen days, hands off
Watch four things and resist the urge to touch anything: the lowest battery voltage each night, the length of the unsent queue, detections per day against the first day, and whether the state partition is growing without bound. The heartbeat shows all four from the desk: the battery is in it (the Witty Pi's input, or the controller's own reading with the VE.Direct cable), and the boot heartbeat after a night is the low point. The box page lists the week's lowest and highest. Once in the fourteen days, pull the panel lead for two days: the silent alert must arrive after 36 hours and clear on the first heartbeat after power returns. The guard stays armed the whole fortnight; a chirp or a siren that nobody caused is a false alarm, goes on the failure list, and moves its threshold before the node goes to a farm. Fourteen days with no intervention is the gate. Anything that needed a visit becomes a line on the kit page's failure list, which is where this design keeps its honesty.
What could send us back, and what we would do
| If | Then |
|---|---|
| the register map does not match the probe | fix the sen0600 profile from the raw words, not from the datasheet |
| the awake draw is far above 5 W | the schedule shortens or the panel grows, and the energy section is rewritten |
| 4G through the painted wall is too weak | buy the CRC9 pigtail, SMA extension and whip that were dropped, and the box grows an external antenna |
| the probes collide | one of them was never re-addressed; only ever set an address with a single probe on the bus |
| the queue empties without arriving | life-flush.service is running after the network is already down, or the state is under the overlay |
| the box holds water | the vented gland is not at the lowest point, or a gland points up |
The claims this build is testing
Everything in this column is currently a model. That is the only reason to build the first one at all.
| Claim | Modelled | Measured by |
|---|---|---|
| awake power | about 5 W | stage 1.2 |
| summer energy | 54.6 Wh/day | stage 2.4 |
| winter energy | 9.6 Wh/day | stage 2.4, extrapolated from the one hour schedule |
| parasitic floor | 4.6 Wh/day | stage 2.4, node powered down |
| SIM budget | 500 MB lasts 9.7 years at hourly batches | stage 1.6 |
| 4G through a plastic wall | adequate | stage 3.6 |
| canopy shading over the panel | 20 percent, a guess | stage 5, at site one |
| the SEN0600 register map | datasheet only | stage 1.3 |