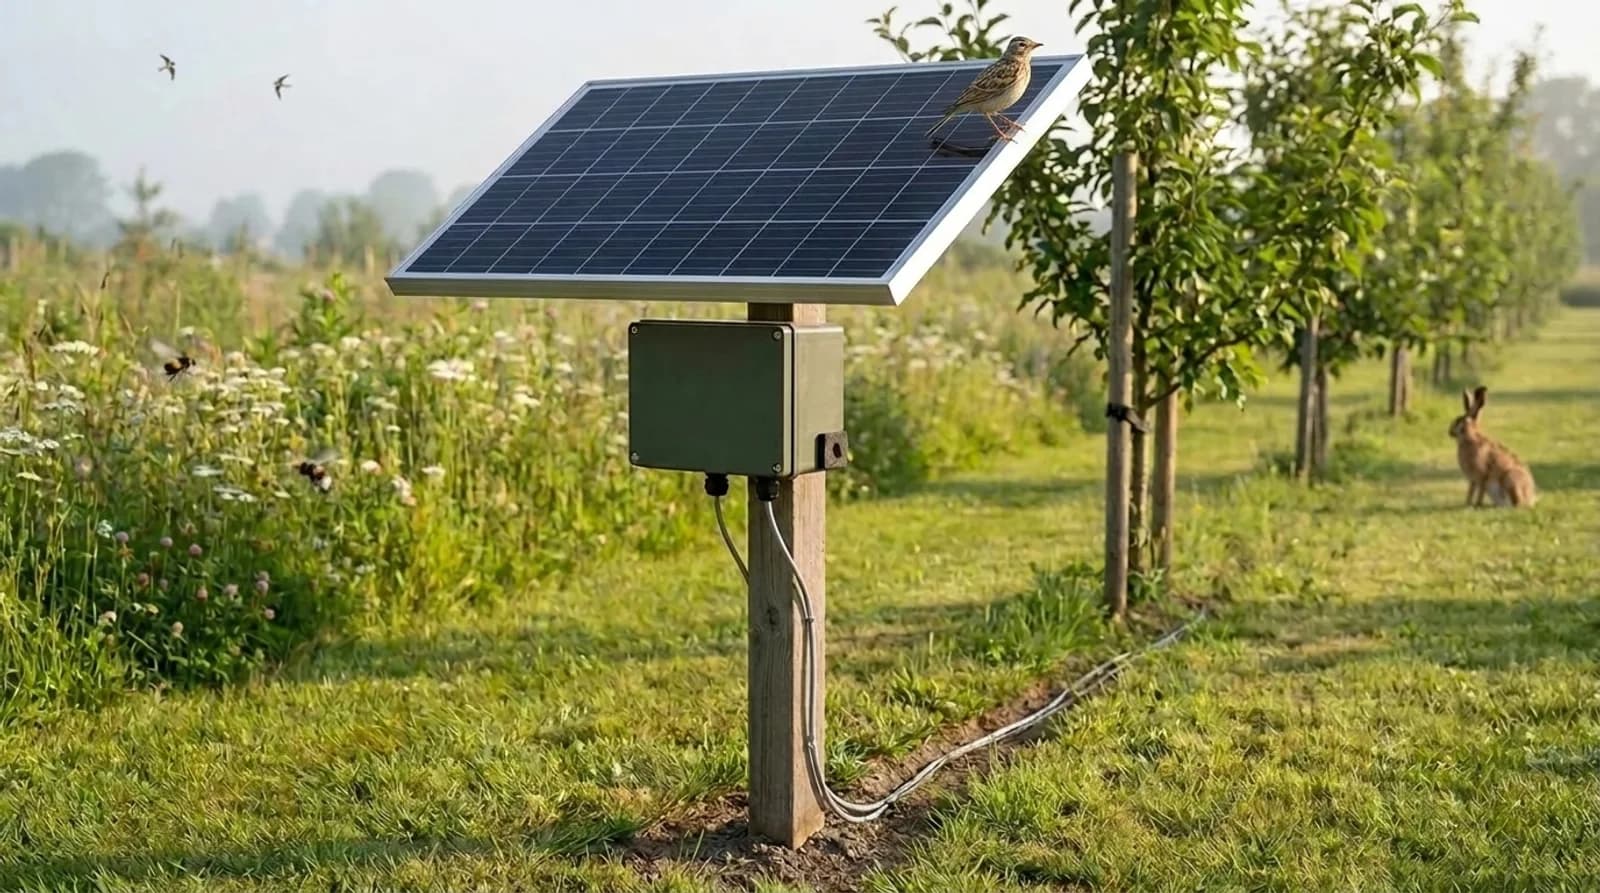
A Life Node listens for birds, reads two soil probes and sends what it hears and feels to the Life Oracle, on solar power and 4G. You need no programming and no command line. You need a laptop, a free afternoon for the desk part, a few evenings for the box, and a spade.
How this page works. All the steps are on this one page, in order. The column on the left shows where you are; tick a step when it is done and the page remembers it on this device. Every step on the desk ends with a check you can see on your box page: a light that turns green when the box has sent what that step was about. Go to the next step when the light is green, not before.
Everything in one list, grouped by shop. No account needed.
1Order the parts
The list below is everything for one box, grouped by shop so the parts arrive in as few parcels as possible. Each line links to the product. Prices were checked on the date in the list and include VAT. A few things come from a DIY shop: they are at the bottom.
You can start the desk steps as soon as the Raspberry Pi, the Witty Pi, the memory card, the microphone, the soil probes, the RS485 adapter and the 4G stick are in. The battery, the panel, the box and the post can follow later.
Two choices to make before you order:
The solar panel. Where the box stands in the open (grass, a field edge): 40 to 50 W is enough. Where a crop will grow over it: 100 W.
The SIM. The 1NCE IoT card is ordered online and arrives by post. It lasts ten years without a monthly bill.
2 m post, pressure-treated class 4, + 2 stainless hose clamps + M8 through-bolts for the panel brackets + cable lock + UV ties + spade
1 ×
EUR 25.00
W2 battery lead
2 x 2.5 mm2 flexible red/black, 1 m
1 ×
EUR 4.00
W2 fuse
inline blade fuse holder + 15 A fuse
1 ×
EUR 4.00
mounting plate
3 mm plastic sheet cut to the box
1 ×
EUR 5.00
windscreen
open-cell foam microphone windscreen, glued over the port
1 ×
EUR 3.00
mic hood
small rigid cap over the mic port, foam inside, opening downward
1 ×
EUR 4.00
USB leads
USB-A extension lead, male to female, 15 to 20 cm, 2 pcs
2 ×
EUR 6.00
paint
Matt green outdoor spray paint for plastic, 400 ml
1 ×
EUR 12.00
Guard hardware
M8 security-Torx or shear-nut through-bolts for the panel brackets, 1 A blade fuse for the siren
1 ×
EUR 6.00
About EUR 859 for everything, postage not included. From kit/order-list.csv; the reasons behind each choice are on the kit page.
Part 2 of 7
Make the software
An account, the software for your box, and the memory card. Only a laptop needed.
2Make your account
Open life.oncra.org/box and type your email address. You get a mail with six digits; type them on the page. That is your account. There is no password to remember: next time you get a new code.
Check The page says Signed in as with your address.
3Make the software for your box
On the same page, give your box a name (anything: Back field, Test box) and type the name and password of the WiFi where you will build it. Capitals and spaces count. Press Make the software for this box. After about a minute a Download button appears.
The download is made for your box only: its WiFi password and its own keys to the oracle are inside, so you never type them on the box itself. Keep the file to yourself. The link on your box page stays; you can download it again any time.
Building the box somewhere else later, or taking it to the field? Make new software for it on the same page. The old card then stops sending, and the new one carries on where it left off.
Check Your box page shows a green Download button with a size of about 0.9 GB.
4Put it on the memory card
Node 1: the card goes in a card reader on the laptop for this step, not in the Pi.
Download the file from your box page. Do not unpack it.
Operating system: scroll to the bottom, choose Use custom, and pick the file you downloaded.
Storage: the memory card. Check the size: choosing the wrong disk erases it.
When it asks about custom settings, choose No. Everything is already in the file.
Wait until it says it is done (about ten minutes), then take the card out.
Check Raspberry Pi Imager says Write successful.
Part 3 of 7
Build it on the desk
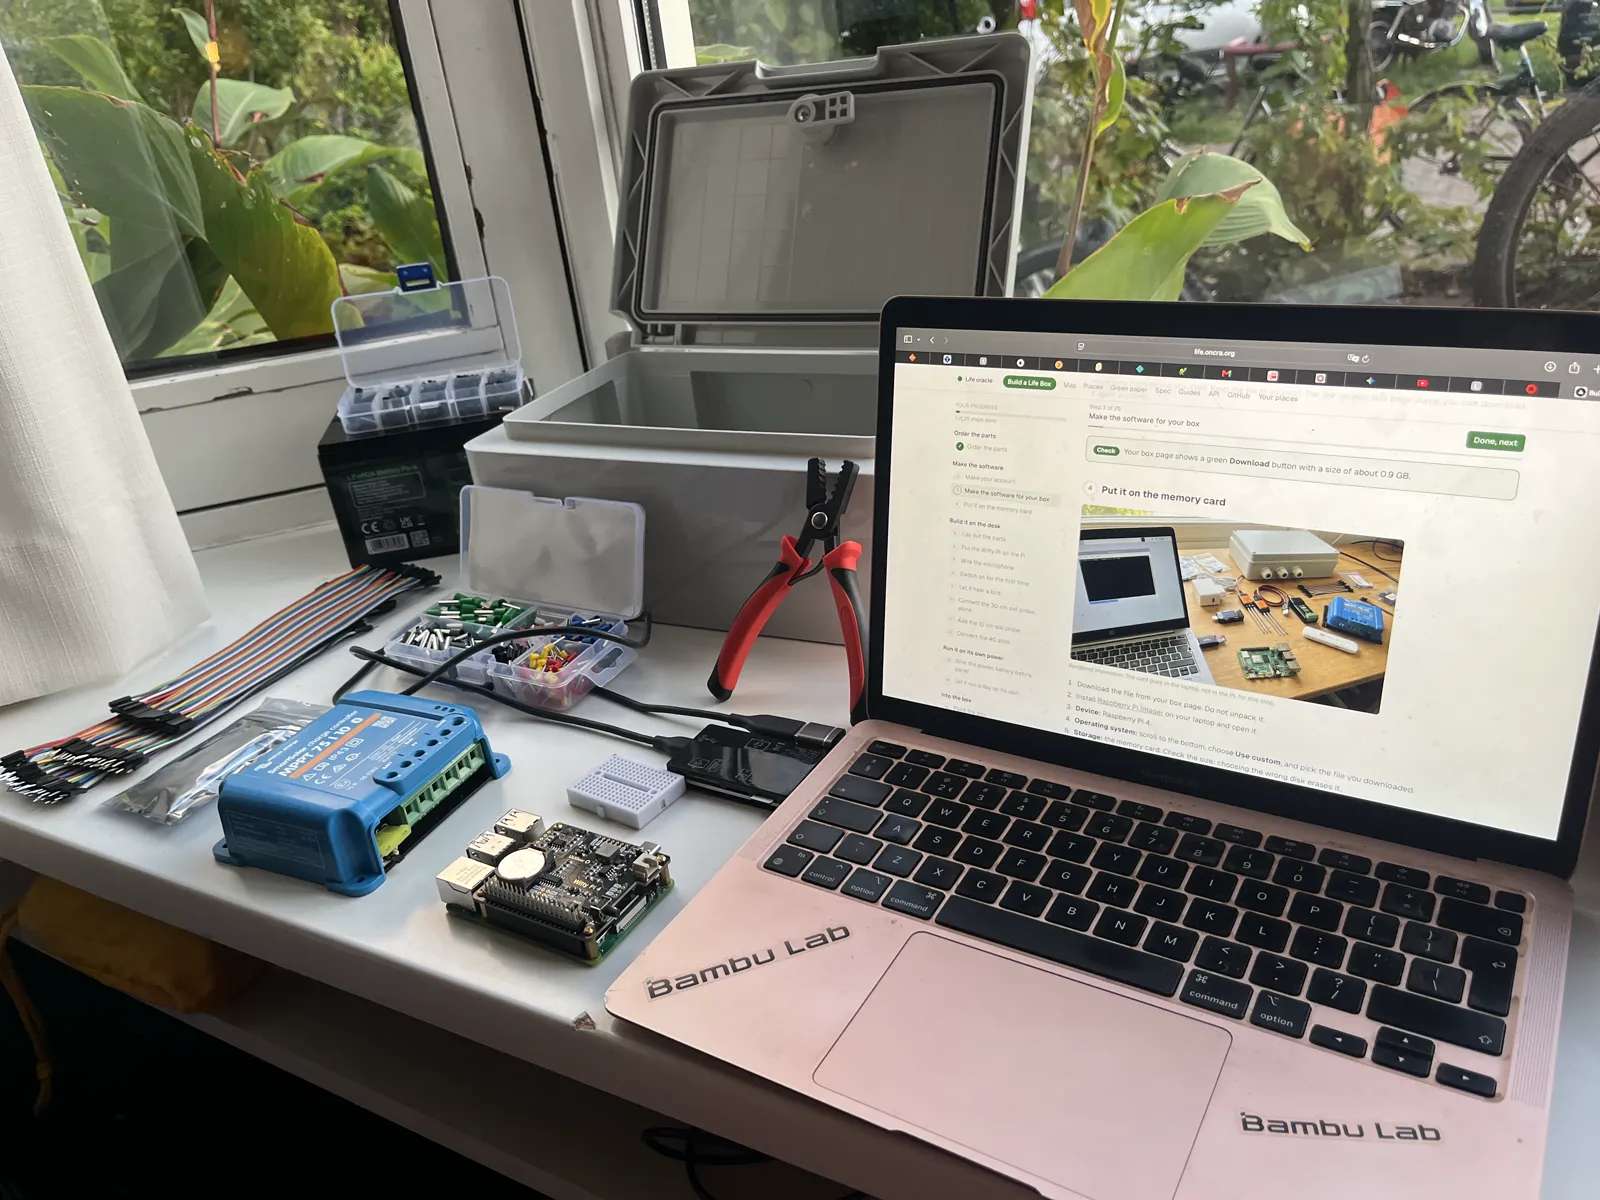
Everything loose on the table, powered from the wall. One part at a time, and each one checked on your box page.
5Lay out the parts
Put everything for this part on the table and tick it off against the list at the end of this part. Look at each soil probe's cable: it should have four wires, brown, black, yellow and blue. A cable with other colours: stop here and ask before you connect it, because a wrong wire on the power can break the probe.
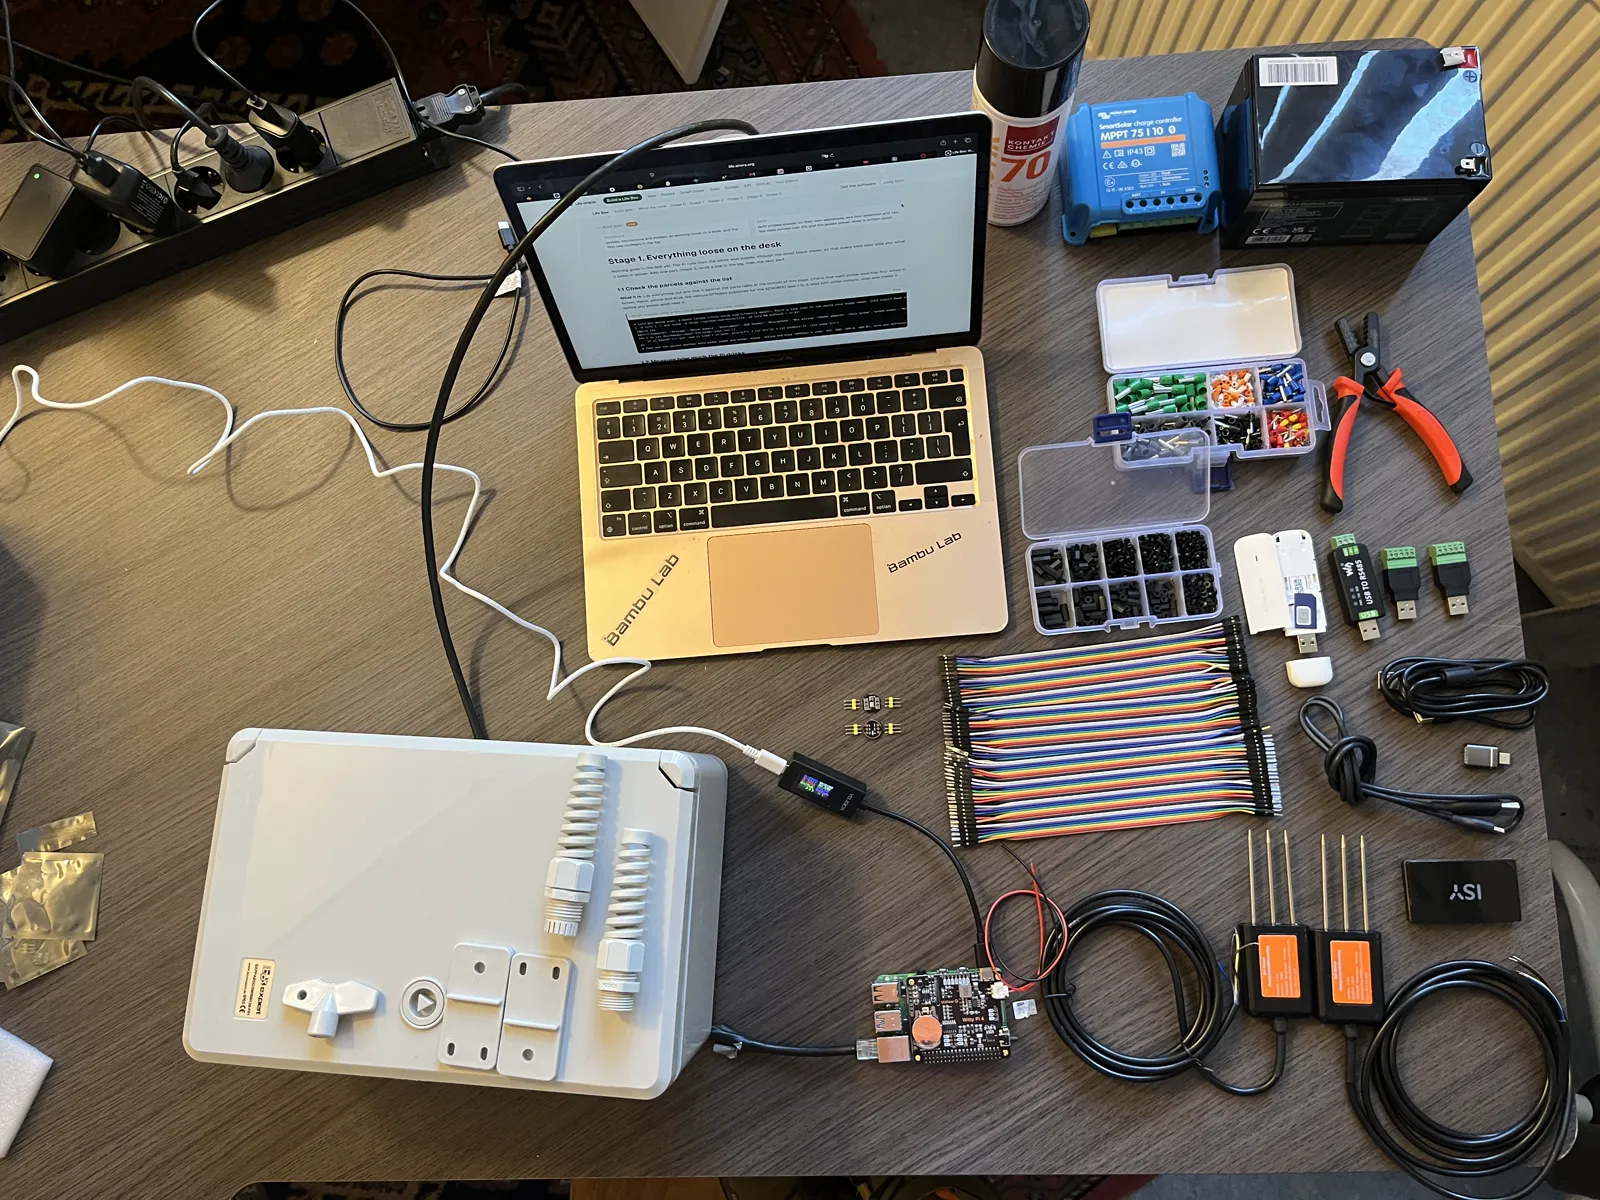
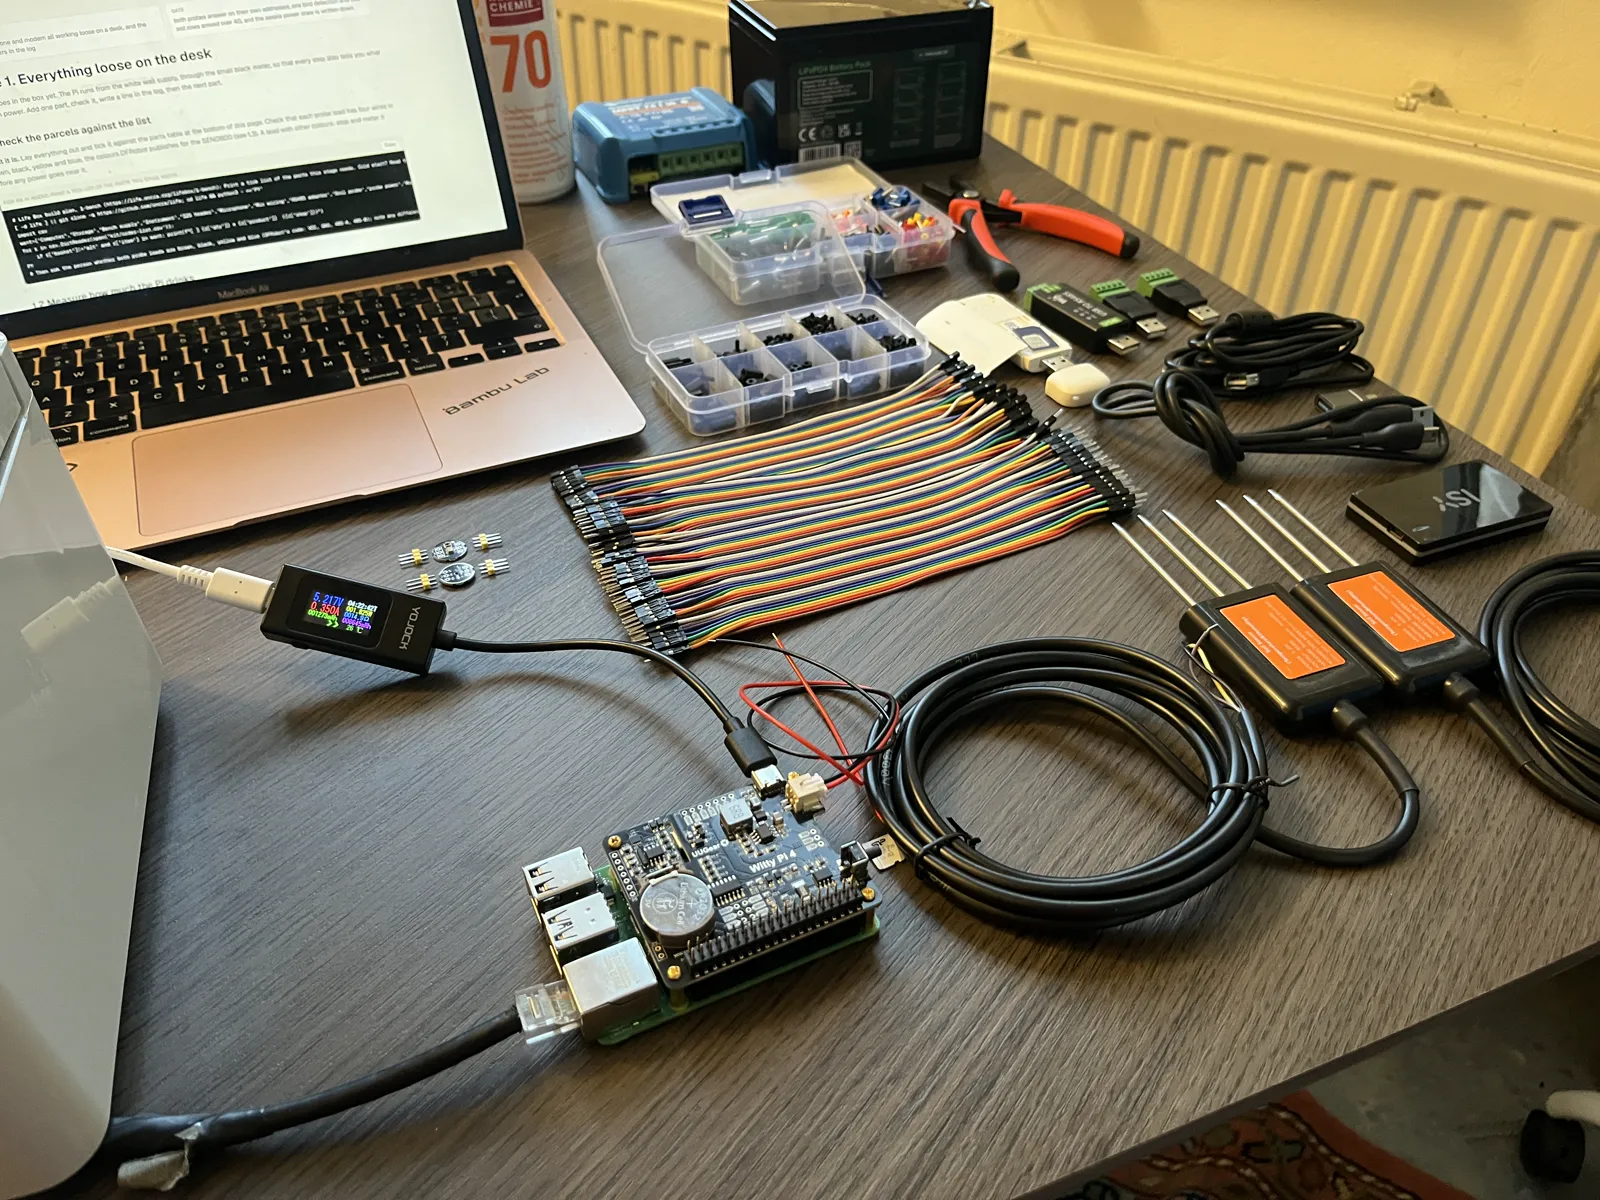
Node 1, 1 October 2026: everything on the table before the build starts.
Nothing goes into the enclosure yet. On the desk you can see every light and reach every wire.
Check Every line in the list has its part on the table.
6Put the Witty Pi on the Pi
The Witty Pi is the box's alarm clock: it switches the Pi on for the hours it should listen, and off for the rest. It sits on top of the Pi.
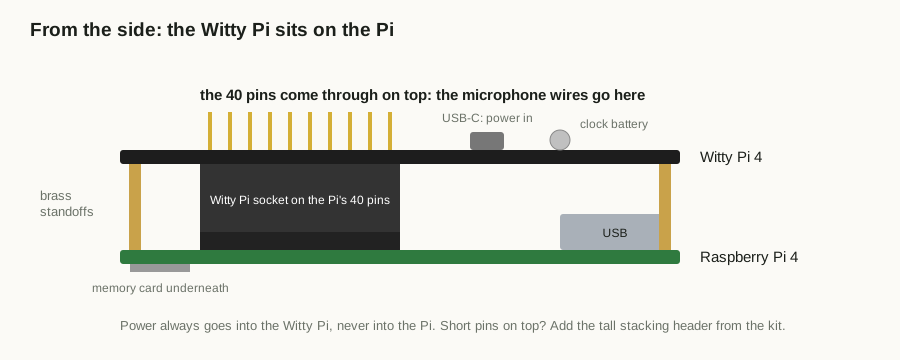
From the bottom up: Raspberry Pi, standoffs, Witty Pi. The pins on top of the Witty Pi are the Pi's own 40 pins, passed through.
Screw the four brass standoffs from the Witty Pi's bag into the corner holes of the Pi.
Press the Witty Pi onto the Pi's 40 pins, straight down, all the way, and screw it to the standoffs.
Put the small round battery (CR2032) in its holder on the Witty Pi, if one came with it. It keeps the clock running when the power is off.
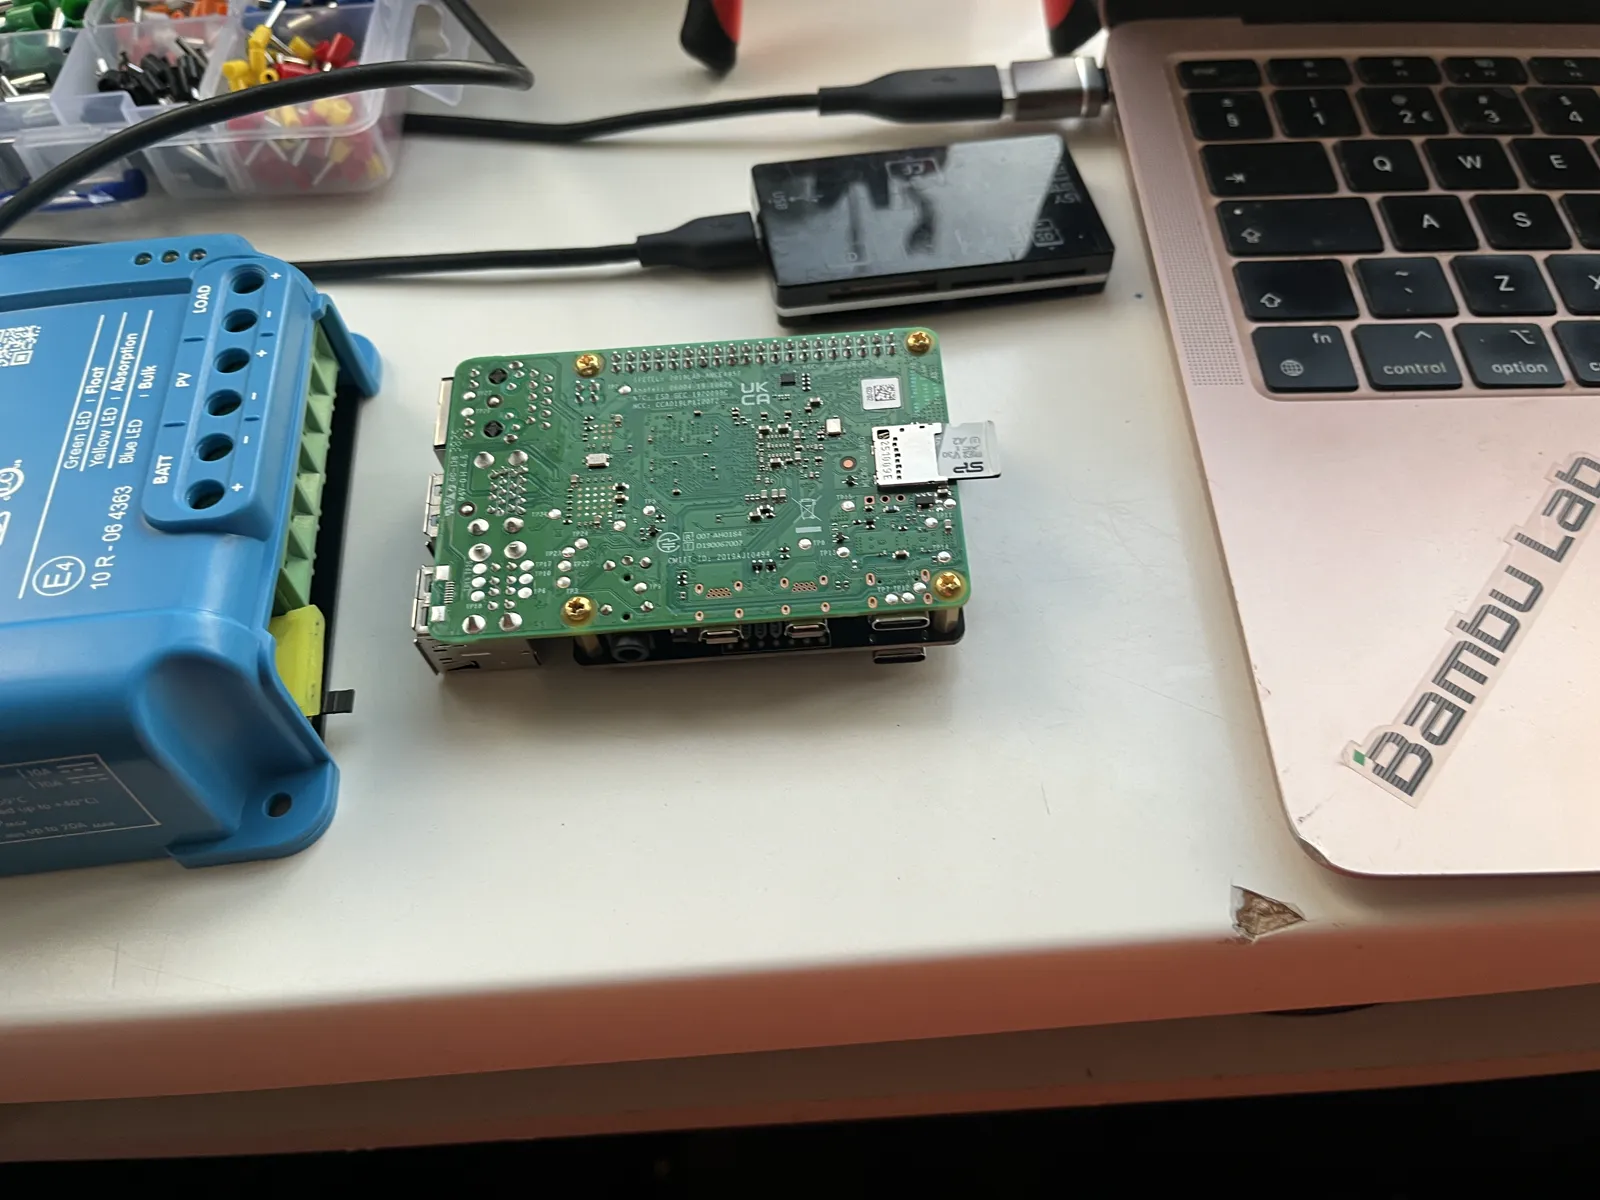
Put the memory card into the slot on the underside of the Pi.
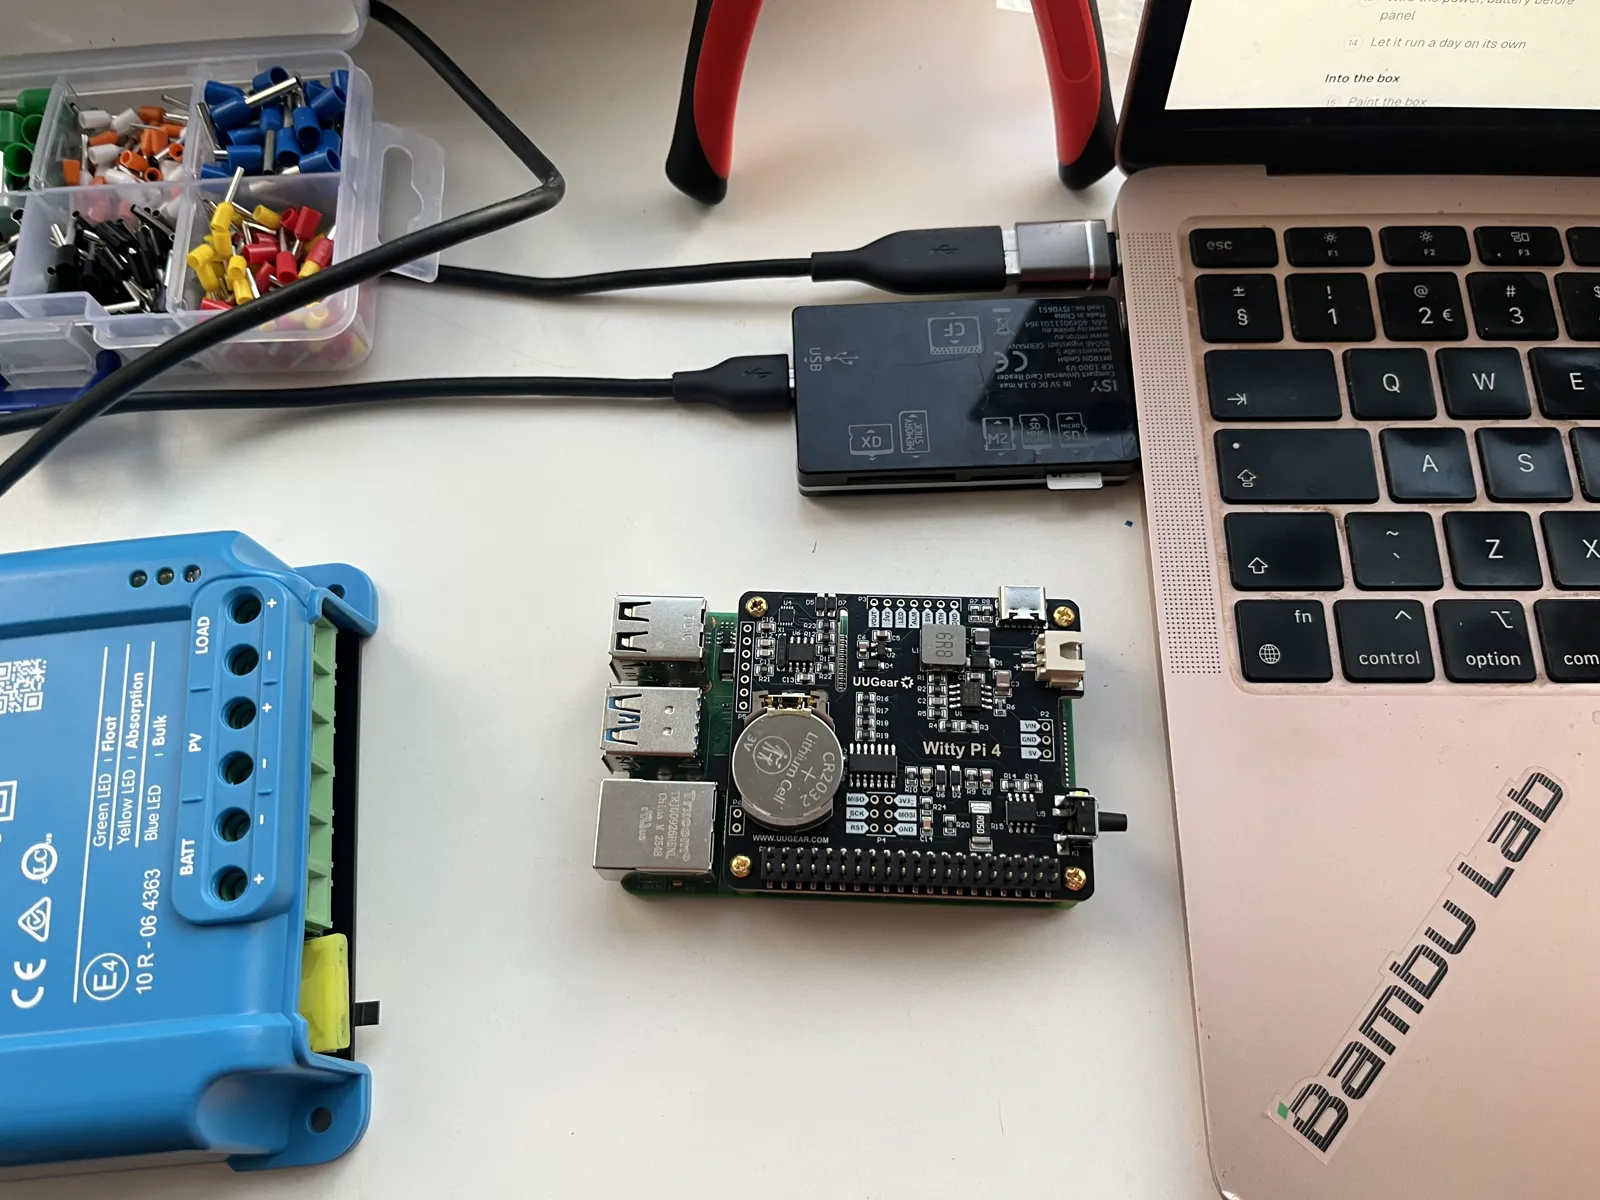
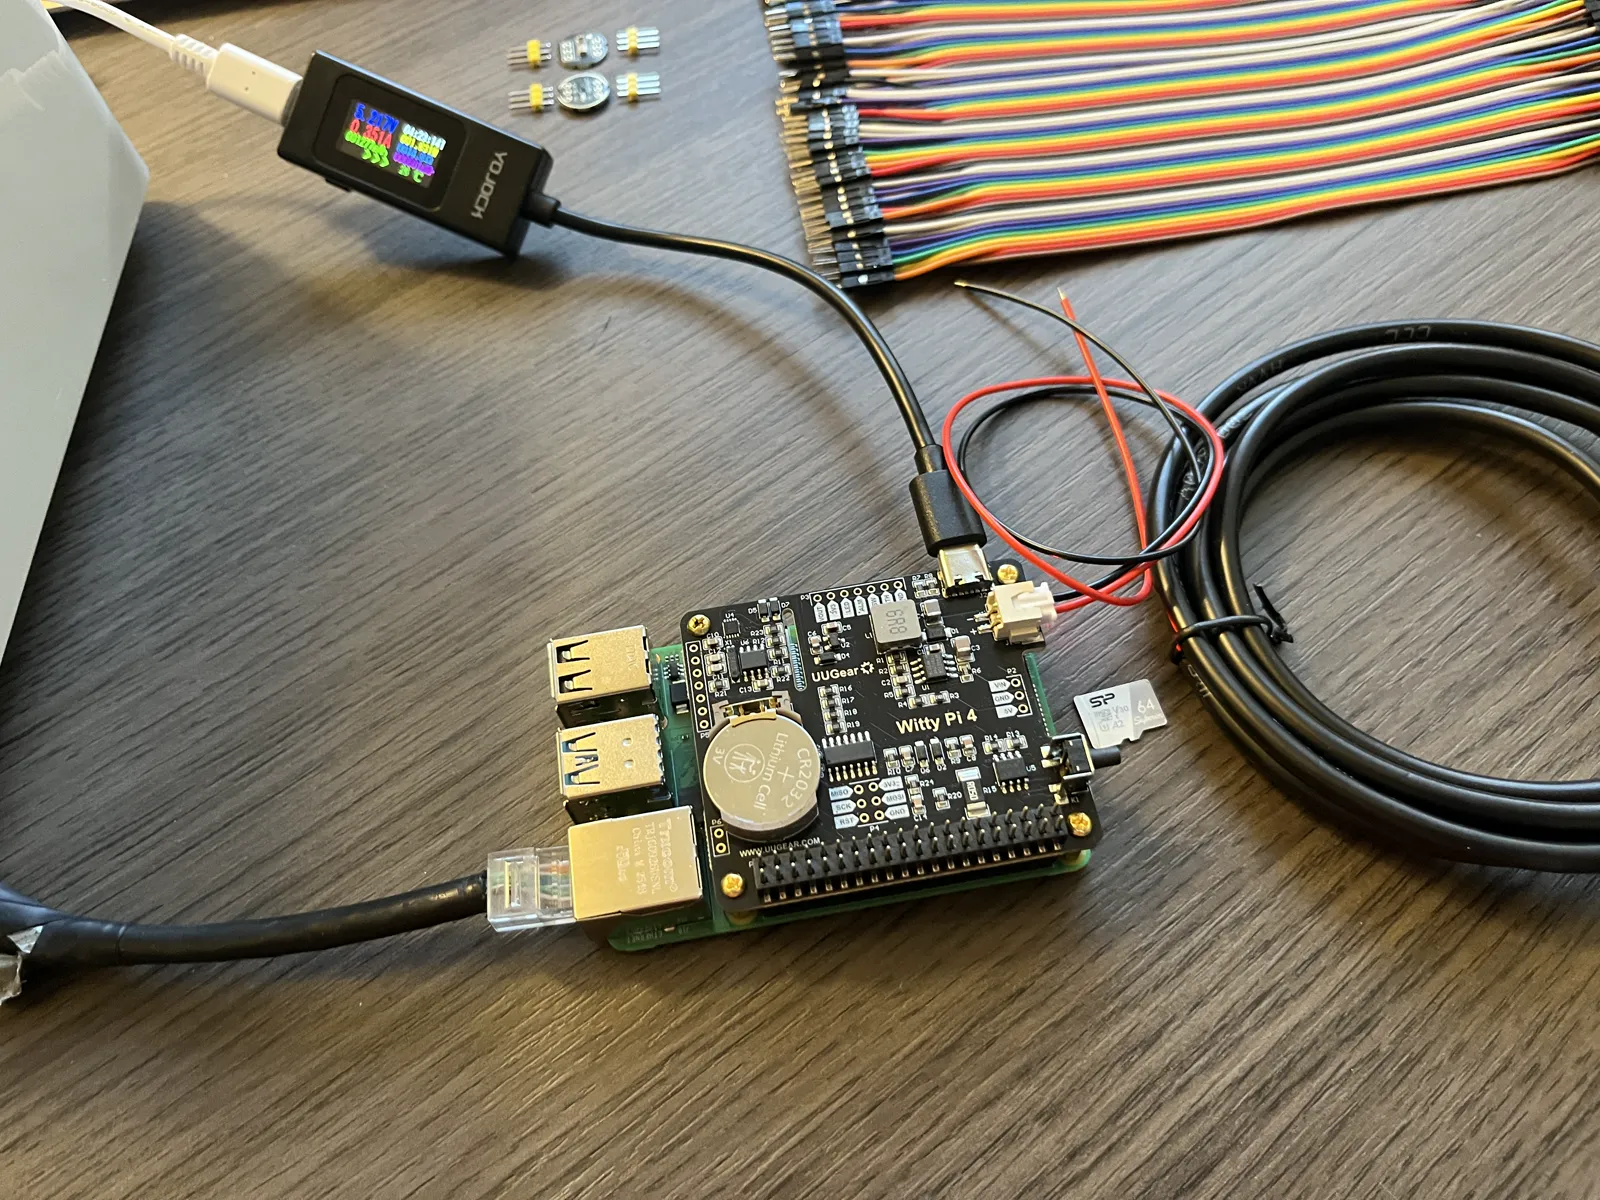
Node 1: the Witty Pi on the Pi. The 40 pins come through along the bottom edge; power goes into the Witty Pi's USB-C socket, at the top.
The Pi's 40 pins come through on top of the Witty Pi, along its edge. The microphone connects to them in the next step.
From now on the power always goes into the Witty Pi, never into the Pi itself: the Witty Pi feeds the Pi, and that is how it can switch it on and off.
Node 1, turned over: the memory card in its slot on the underside of the Pi, label facing out.
Do not switch anything on yet.
7Wire the microphone
The microphone is the small round black board, about 14 mm across, with a tiny hole in the middle: that hole is where the sound goes in. It comes with two loose strips of three pins, which have to be soldered on first. If you have never soldered, ask someone who has; it takes five minutes.
Push both strips into the board from the side with the chip (the small metal block), long pins pointing up.
Turn it over and solder the six pins on the side with the hole.
Clip the short ends flush on that side, so the hole side lies flat against the port in the box later.
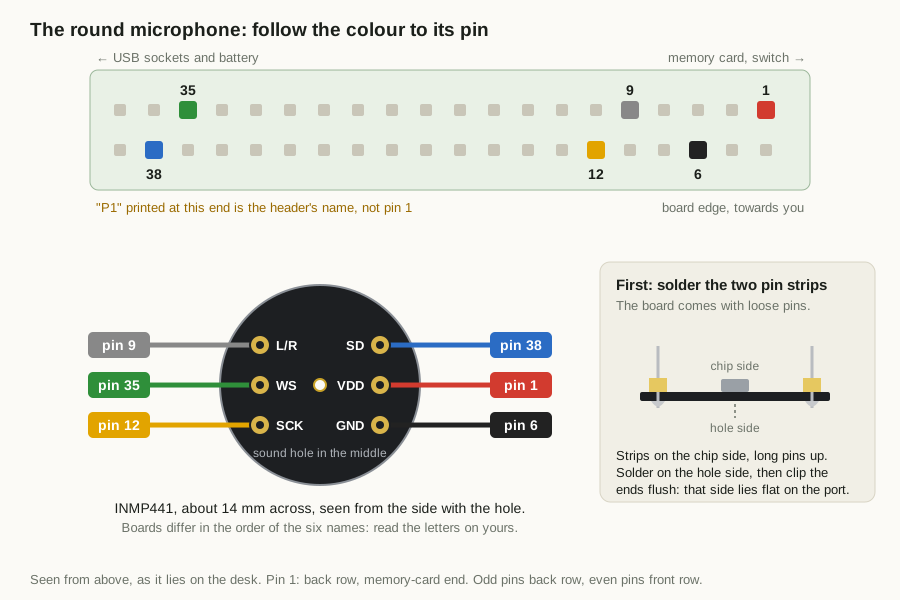
Then it connects with six short jumper wires to the pins on top of the Witty Pi. The names (VDD, GND, L/R, SCK, WS, SD) are printed next to the pins on the board; boards differ in the order, so go by the letters, not by where a pin sits. The Witty Pi pins are numbered: pin 1 is the corner pin at the memory-card end, away from the USB sockets and the battery, on the row towards the middle of the board. Odd numbers run along that row, even numbers along the row at the edge. The "P1" printed at the battery end is the name of the whole 40-pin header, not pin 1. To be sure, look under the Raspberry Pi: pin 1 is the only one with a square solder pad.
The header as it lies on the desk, USB sockets to the left. Six wires, each colour to its pin. L/R goes to ground, which makes it the left channel.
Microphone pin
Header pin
What it is
VDD
1
3.3 V power
GND
6
ground
L/R
9
ground (left channel)
SCK
12
clock
WS
35
word select
SD
38
sound data
Check each wire twice against the table, reading the letters on the board. Power on the wrong pin can break the microphone, nothing else.
8Switch on for the first time
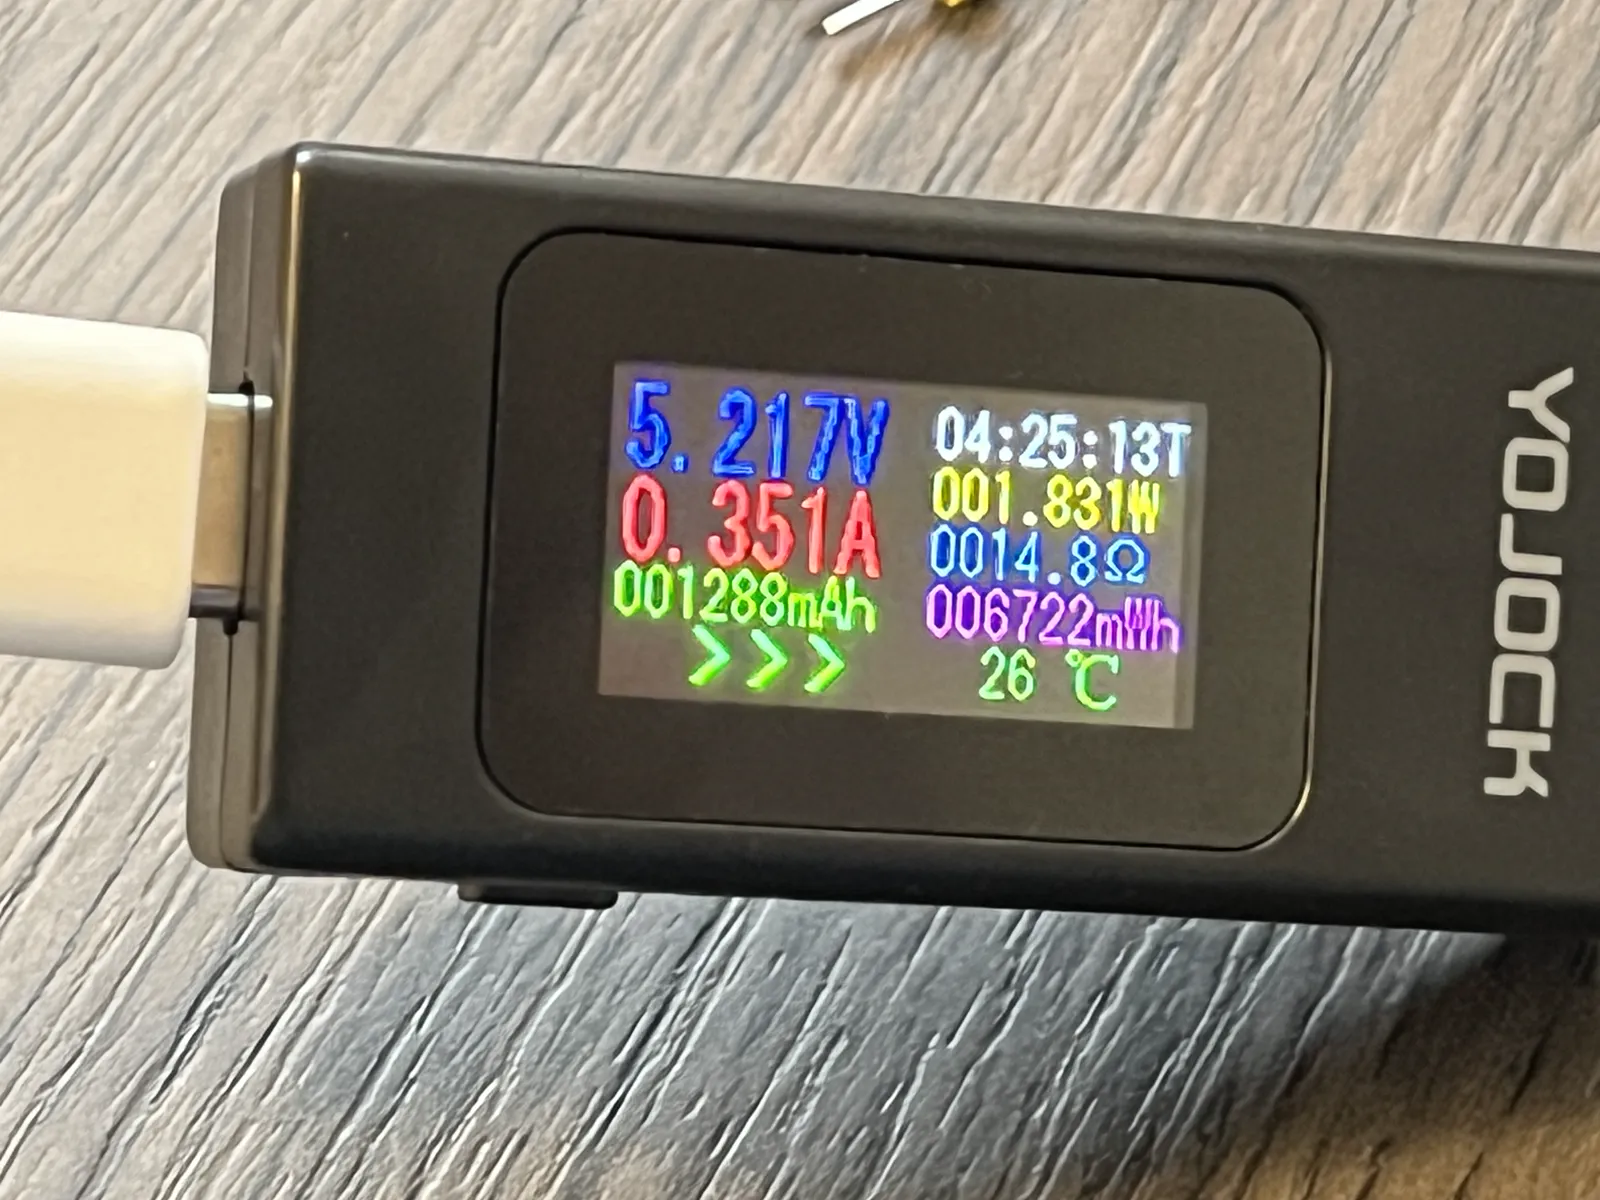
Node 1 on the desk. The meter sits between the wall supply and the Witty Pi, so you can read how much power the box uses.
Plug the small black meter into the power supply, and the supply's cable from the meter into the USB-C socket of the Witty Pi (not the one on the Pi).
Plug the supply into the wall. If the Pi does not start by itself, press the button on the Witty Pi once.
Wait. The first start takes a few minutes and the box restarts itself once. A flickering green light is normal.
The meter on node 1: volts, amps and, top right in yellow, watts. Watts is the number to write down.
Write down the watts the meter shows after ten minutes. About 5 W is expected; that number decides how big the battery and panel need to be. Above 6.5 W, tell us via the feedback box at the bottom of this page.
On the desk the box wakes up once an hour and listens for 15 minutes, then switches itself off. That is the Witty Pi doing its job. When the box seems dead, look at the clock: it is waiting for the next hour.
Check On your box page, The box is on turns green. That can take up to 15 minutes after switching on.
9Let it hear a bird
Play a blackbird or a robin from your phone for a minute or two, with the phone's speaker 5 to 10 cm from the small hole in the microphone.
Keep the room quiet while it plays: no talking, no radio, no television. The box throws away every few seconds of sound in which it hears a human voice, birds included. That is on purpose: it is how the box keeps its promise that it never records people, and in a field it costs nothing. On a desk it costs birds. On node 1, three minutes of bird recordings with people talking in the room gave 7 detections, with 36 stretches thrown away; the next three minutes in silence gave 14, with none thrown away. A video with a narrator talking all the way through can lose every one of them.
So use a recording of the bird alone. xeno-canto.org has field recordings of every species without commentary: search for blackbird or Turdus merula.
Check On your box page, Microphone turns green with the name of the bird. The box sends what it heard once an hour, so this light can take up to an hour. No bird after two tries: try once more in a silent room with a recording that has no voice in it. Still nothing: check the six wires against the table. A microphone that is wired wrong gives no sound at all, not hiss.
10Connect the 30 cm soil probe, alone
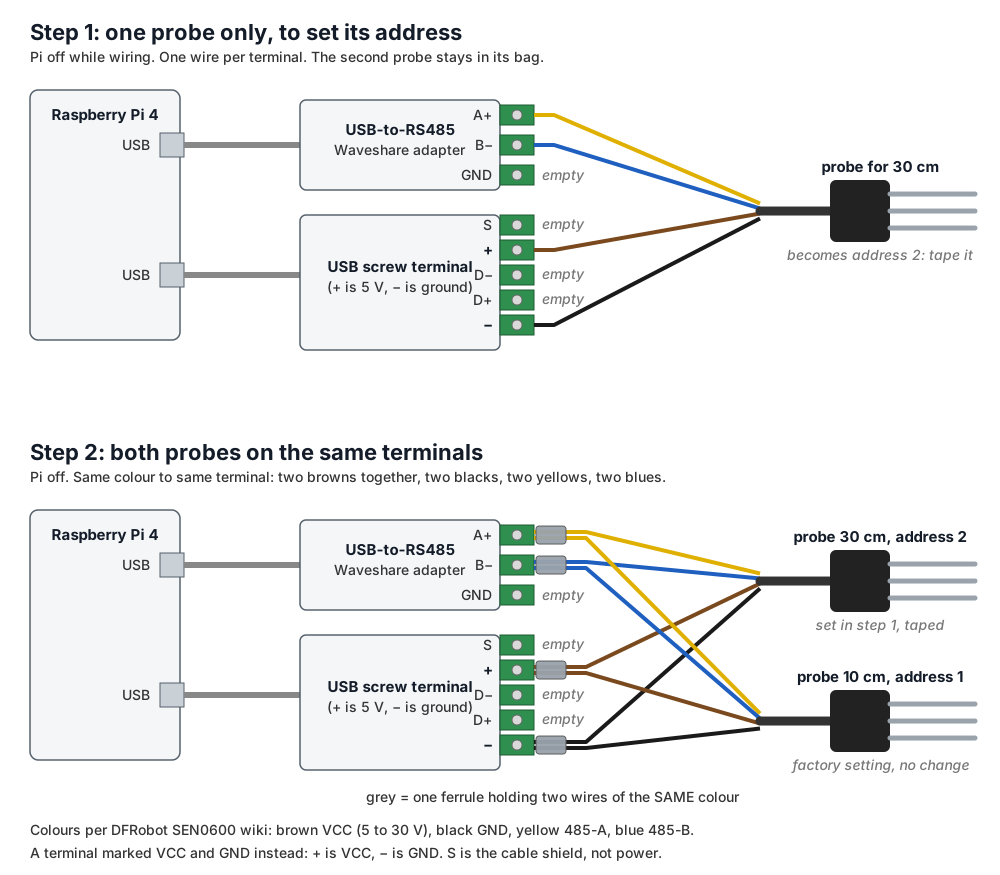
Both probes leave the factory with the same address, so the box cannot tell them apart. You fix that by connecting one probe first: the box sees a single probe and gives it its own address by itself. Then the second one joins.
Step 1 is this part: one probe. Step 2, in the next step, adds the second probe on the same terminals.
Switch off: pull the power supply out of the wall.
Plug the USB screw terminal straight into a USB port of the Pi. Plug the RS485 adapter into a short USB extension lead, and the lead into another port. The Pi's four USB ports sit close together, in two pairs one above the other, and the adapter is too wide to sit next to another plug. The 4G stick, later, gets the second lead.
Take one probe; leave the other in its bag. No ferrules needed yet: the bare wires go straight into the terminals.
The USB screw terminal has five screws, marked S, +, D−, D+, −. Brown into + and black into −. The other three stay empty: S is the cable shield, not power, and a probe on S gets no power and stays silent. (Some terminals say VCC and GND instead: then brown into VCC, black into GND.) Yellow into A+ and blue into B− of the RS485 adapter, not into D+ and D−. Tighten the screws and tug each wire.
Wrap a piece of tape around this probe's cable and write 30 cm on it. The two probes look the same; from now on the tape is the only way to tell them apart.
Put the prongs in a glass of water and switch on.
Check On your box page, Soil probe 30 cm turns green, with a moisture close to 100% (the prongs are in water). Then switch off. Nothing on the light after an hour: check that brown sits in + and not in S, then try swapping yellow and blue. Neither mistake breaks anything.
11Add the 10 cm soil probe
Switch off.
Take the four wires of the taped probe out of their terminals.
Lay the second probe's wires next to them, same colour with same colour: brown with brown, black with black, yellow with yellow, blue with blue.
Twist each pair together tightly, same colour with same colour, so the strands of both wires make one bundle.
Put the four pairs back into the same terminals as before, tighten the screws, and tug both wires of each pair: neither may come out. Turn the screw firmly but not so hard that strands break.
A ferrule is optional. It holds the strands of both wires together, so the screw cannot push them apart, and it lasts longer in a box that gets warm and cold. Use one if a pair still slips out after you tighten the screw: put the pair into one ferrule together (one that holds two wires) and crimp it with the pliers. Do not solder the ends that go under a screw: solder slowly gives way under the pressure, so the screw loosens over the seasons and the probe drops out.
6. Prongs of both probes in the air this time, and switch on.
Check Both Soil probe 10 cm and Soil probe 30 cm are green with a fresh time, and the moisture now reads close to 0% (the prongs are in air). Hold the prongs of one probe in your hand for a minute: its temperature goes up on the next reading.
12Connect the 4G stick
The white stick is the box's own phone line, for the field where there is no WiFi.
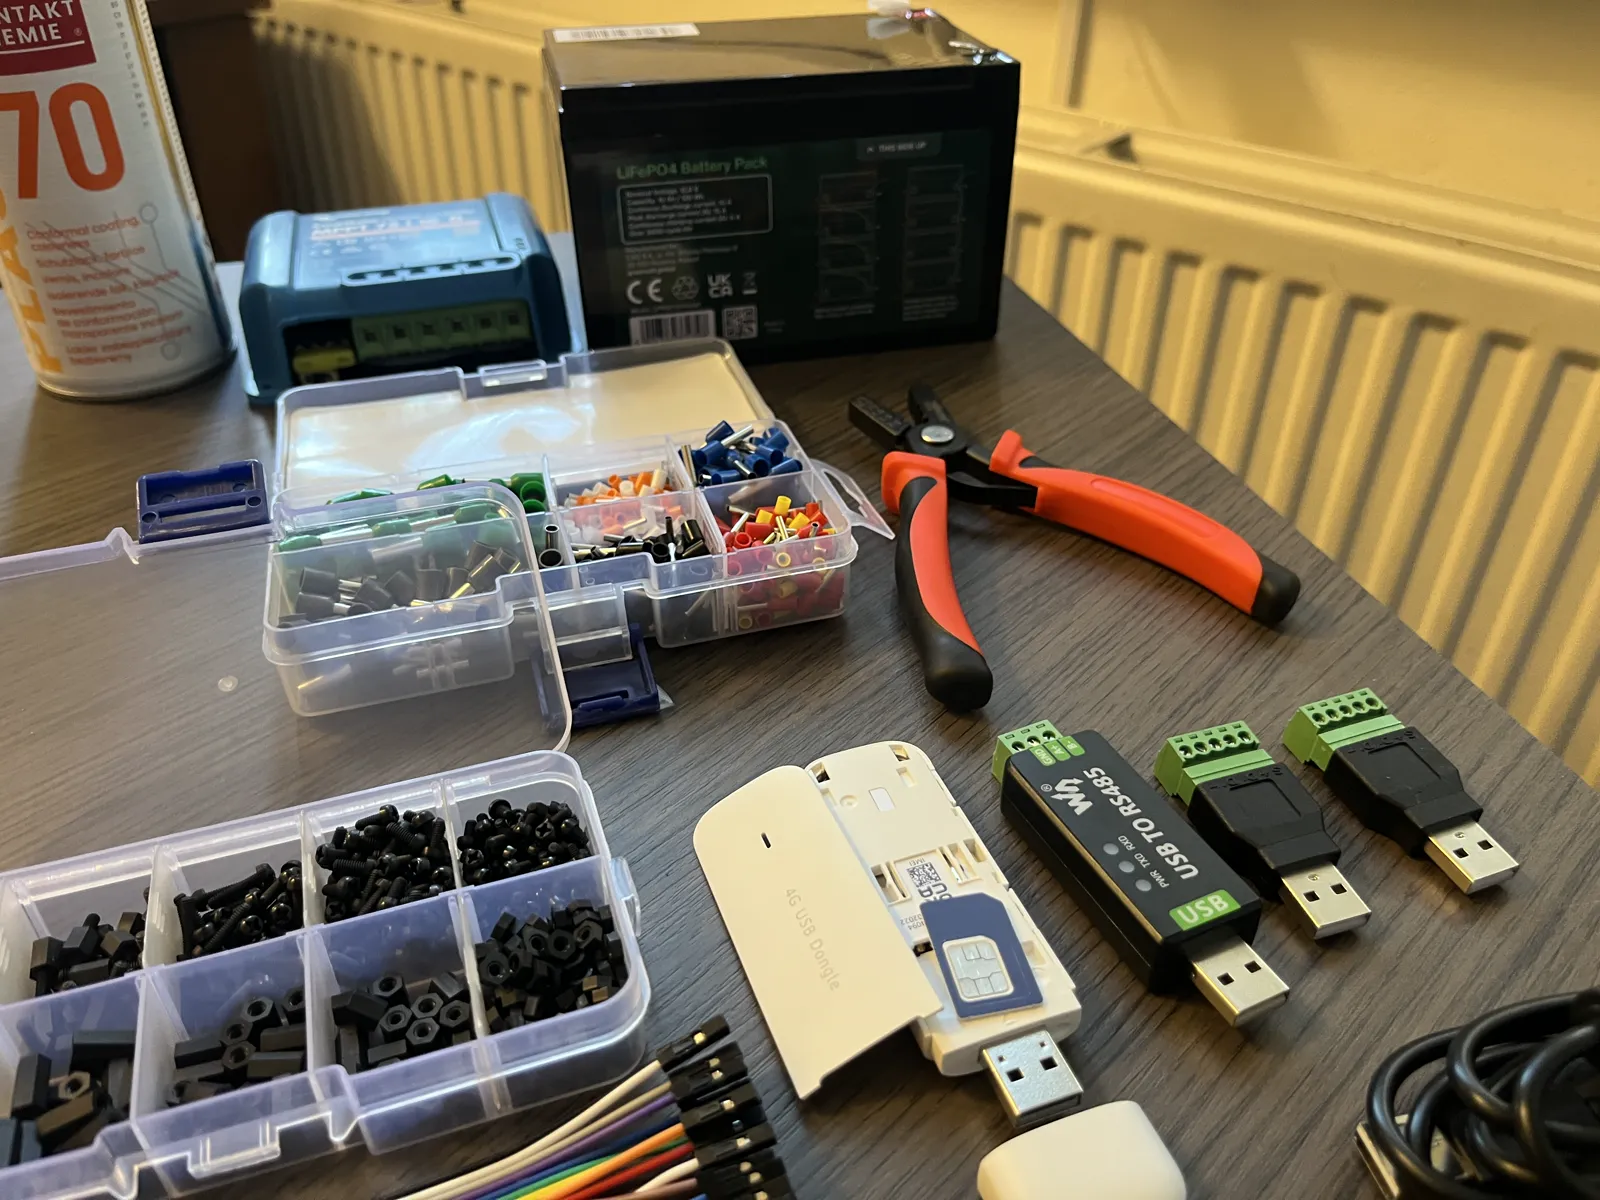
Node 1: the 4G stick open with its SIM in, the RS485 adapter and the two USB screw terminals in front, ferrules and crimping pliers behind.
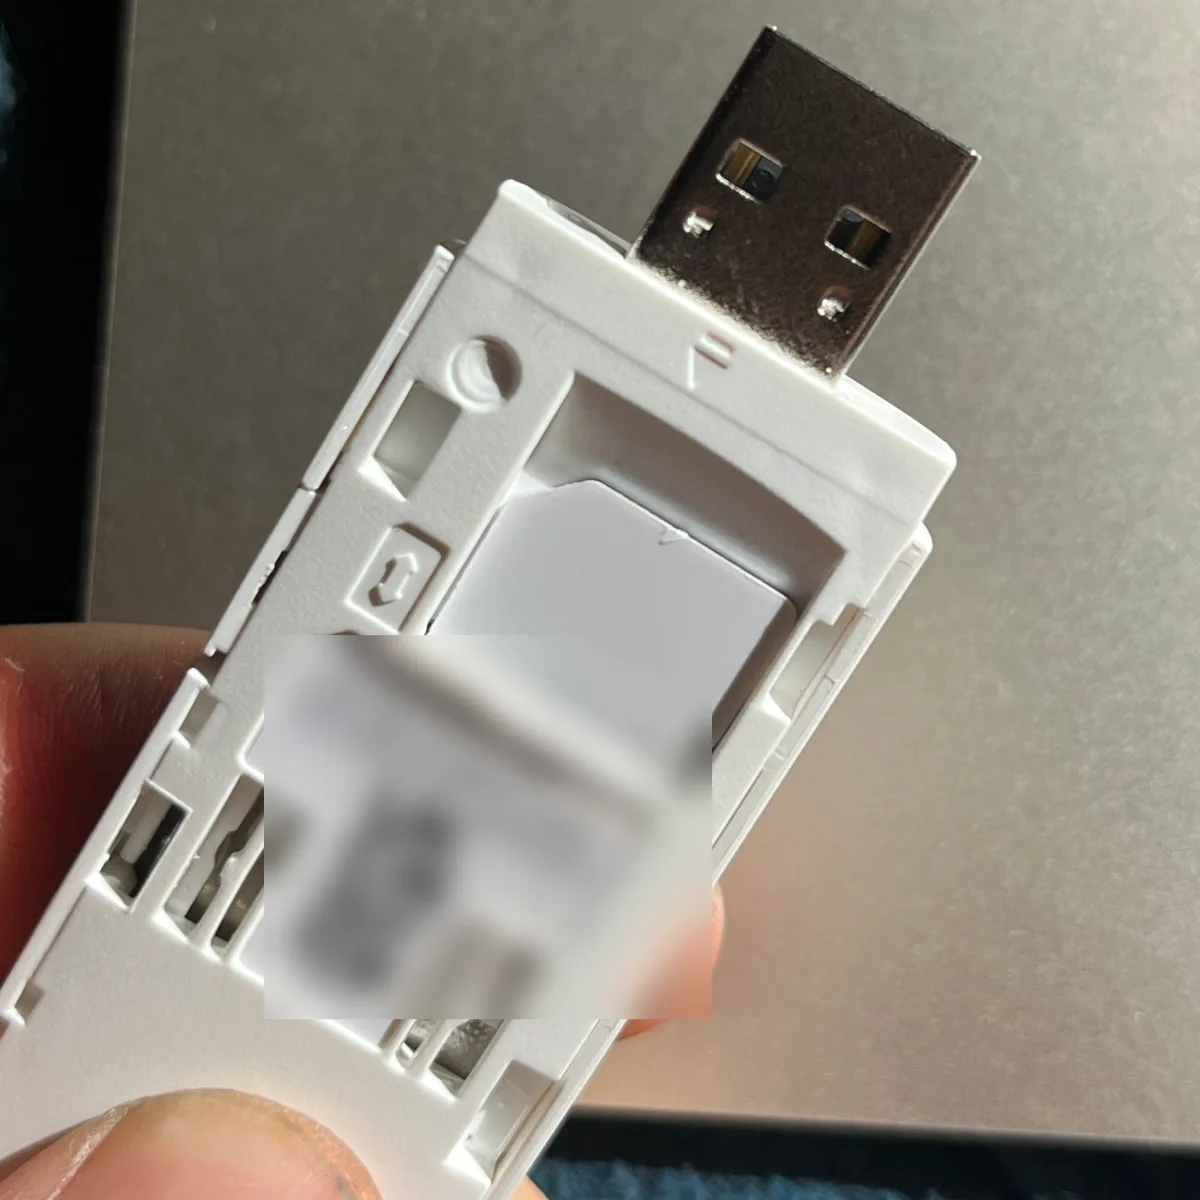
Slide the white cover off the stick and put the SIM in with its gold contacts facing down, so you look at the blank side, and its cut corner at the end of the USB plug, as in the photo below. A small corner pressed into the plastic above the slot shows the same thing. Push the card in until it stops and put the cover back.
Node 1: the SIM the right way round. Blank side up, gold contacts down, cut corner towards the USB plug.
Plug the stick into your laptop first. After half a minute, open 192.168.8.1 in your browser: that is the stick's own page. If it says SIM card not inserted or not working, the card is in upside down or not pushed home. Take the stick out, turn the card over, and plug the stick in again: it only looks for the card when it starts.
Under the mobile network settings (often Settings, then Profile management), add a profile with the network name (APN) iot.1nce.net, save it, and make it the default.
Switch data roaming on, on the same settings pages. The 1NCE card is a foreign card in every country, so without roaming the stick finds the network and then says Data connections are disabled while roaming.
When the stick's light shows it is connected, take it out of the laptop and plug it into the Pi. It is too wide to sit next to the other plugs: put it on the second USB extension lead.
You can leave the stick in while the box is on your desk. The box uses a network cable first, then your WiFi, and the SIM only when it has neither, so the desk does not eat into the card's ten years.
Check On your box page, 4G turns green after the next hourly wake-up. All lights green: the electronics work. Well done.
What you need for this part (14)
Computer: Raspberry Pi 4 Model B 4 GB
Storage: Silicon Power Superior A2 64 GB microSDXC (bench card)
I2S header: 40-pin GPIO stacking header, 2x20 female, 8.5 mm with 10 mm pins
Scheduler + DC/DC: Witty Pi 4
probe power: QWORK USB-A male to 5-pin screw terminal adapter, 2 pcs
Part 4 of 7
Run it on its own power
Battery, charge controller and panel. The box runs a day without the wall socket.
13Wire the power, battery before panel
Node 1 at the window: the battery (black) and the charge controller (blue) are the parts this step adds.
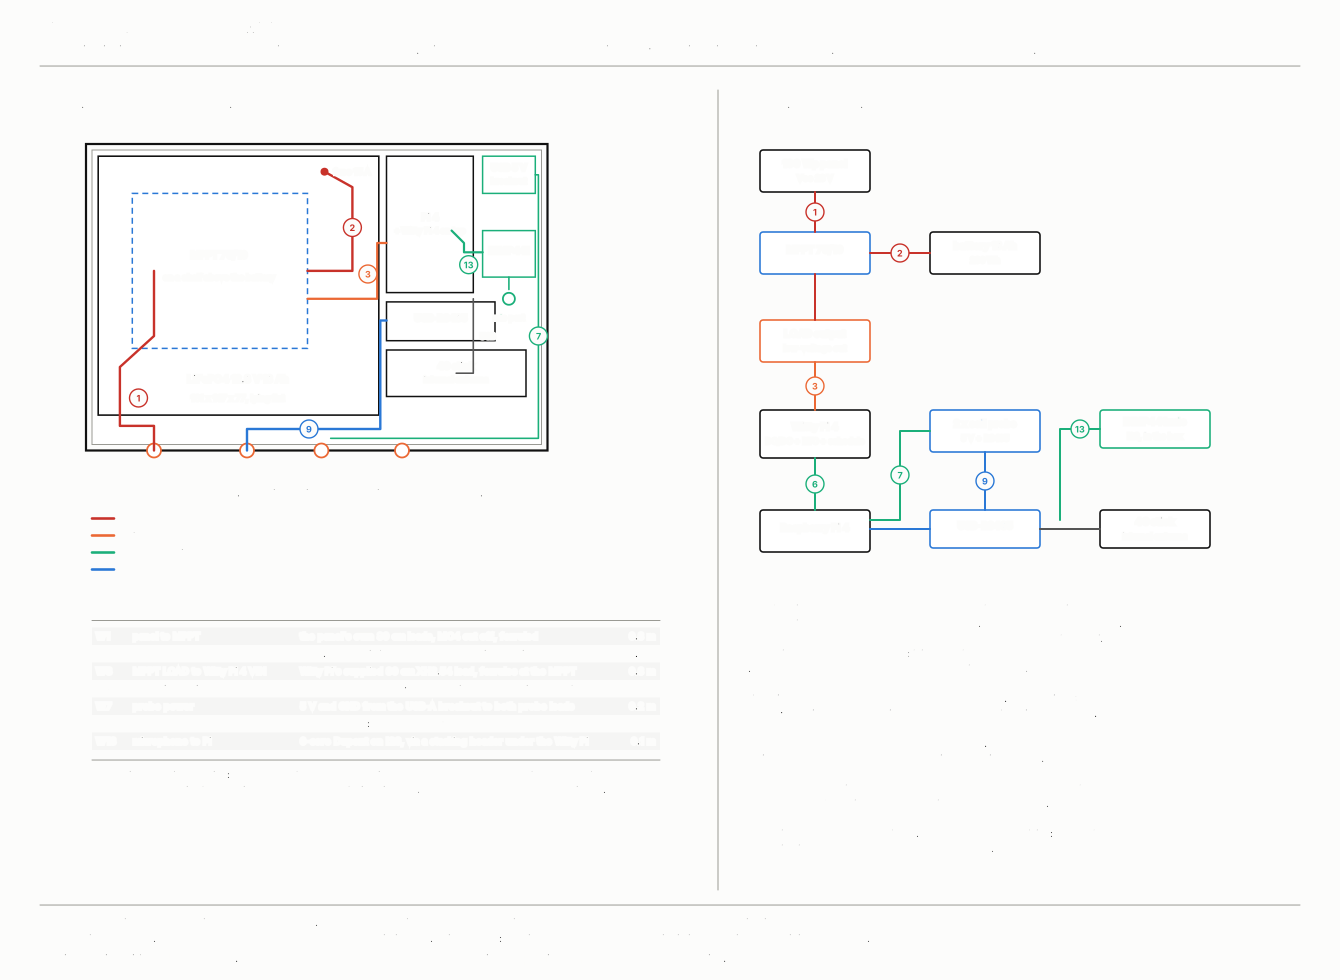
In the field there is no socket. The panel charges the battery, the blue Victron charge controller looks after the battery, and the Witty Pi takes its power from the controller.
The complete wiring of the box. On the desk you only need the controller, the battery, the fuse and the Witty Pi.
Switch off and unplug the wall supply from the Witty Pi.
Two wires from the controller's LOAD + and LOAD − to the Witty Pi's small white 6 to 30 V connector. Red is plus.
The battery lead: the fuse holder goes in the red wire, within a hand's width of the battery. The fuse is not optional: a short circuit on a battery without one can start a fire.
Connect the battery lead to the controller's BAT terminals first, then to the battery: red to plus, black to minus.
Only now the panel, into the PV terminals. Indoors, lean it against a window; it gives a tenth of its power there, enough to see it charge.
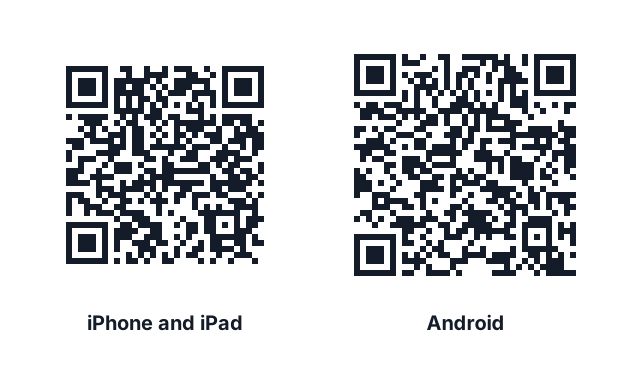
Install the VictronConnect app on your phone. It is the only way to see and set the controller, and neither the box nor the code printed on the controller leads you to it. Scan the code for your phone below, or search for VictronConnect in the App Store or Google Play.
Scan with your phone's camera: left for iPhone and iPad, right for Android. Both open the VictronConnect app in the store.
Open the app, with Bluetooth on, next to the controller. It finds the controller by itself and then asks for a PIN code. That code is on a sticker on the side of the controller. Older controllers have no sticker; their code is 000000.
In the app, choose the LiFePO4 battery preset. In VictronConnect it is called Smart Lithium (LiFePO4), under settings (the gear wheel), Battery preset.
The probes keep their power from the Pi's USB port, so they are off whenever the Pi sleeps. Never connect them to the controller.
Check In the Victron app the battery shows a voltage above 12.8 V and, with the panel at the window, a small charging current. Tap the Witty Pi's button: the box starts.
14Let it run a day on its own
Leave the box on the desk for 24 hours without touching it. It wakes every hour, measures, sends, and sleeps.
Then pull the battery lead while the box is awake, wait a minute, and put it back. Do that three times. Each time the box must come back by itself at the next hour. Power that disappears in the middle of a sentence is the most likely thing to happen in a field; the box is built so that it loses nothing when it does.
Check On your box page, The box is on shows a time from the last hour, the soil lights carry fresh readings, and the Victron app shows the battery did not drop below 12.5 V overnight.
What you need for this part (5)
Charge controller: Victron SmartSolar MPPT 75/10
Solar panel: Victron BlueSolar 40 W 12 V mono
Battery: Lithium battery LiFePO4 12.8 V 20 Ah, 256 Wh, 181 x 76 x 170 mm, M5 terminals
W2 battery lead: 2 x 2.5 mm2 flexible red/black, 1 m
W2 fuse: inline blade fuse holder + 15 A fuse
Part 5 of 7
Into the box
Paint it, lay it out on plastic, make the microphone hole, seal it, then hose it.
15Paint the box
The box is plastic, and sunlight makes plastic brittle in a few years. Paint it matt green, outside, while it is still empty: one coat of plastic primer, then two thin coats of outdoor paint for plastic. The paint is its sun cream first and its camouflage second. Let it dry for a day.
16Lay everything out on plastic
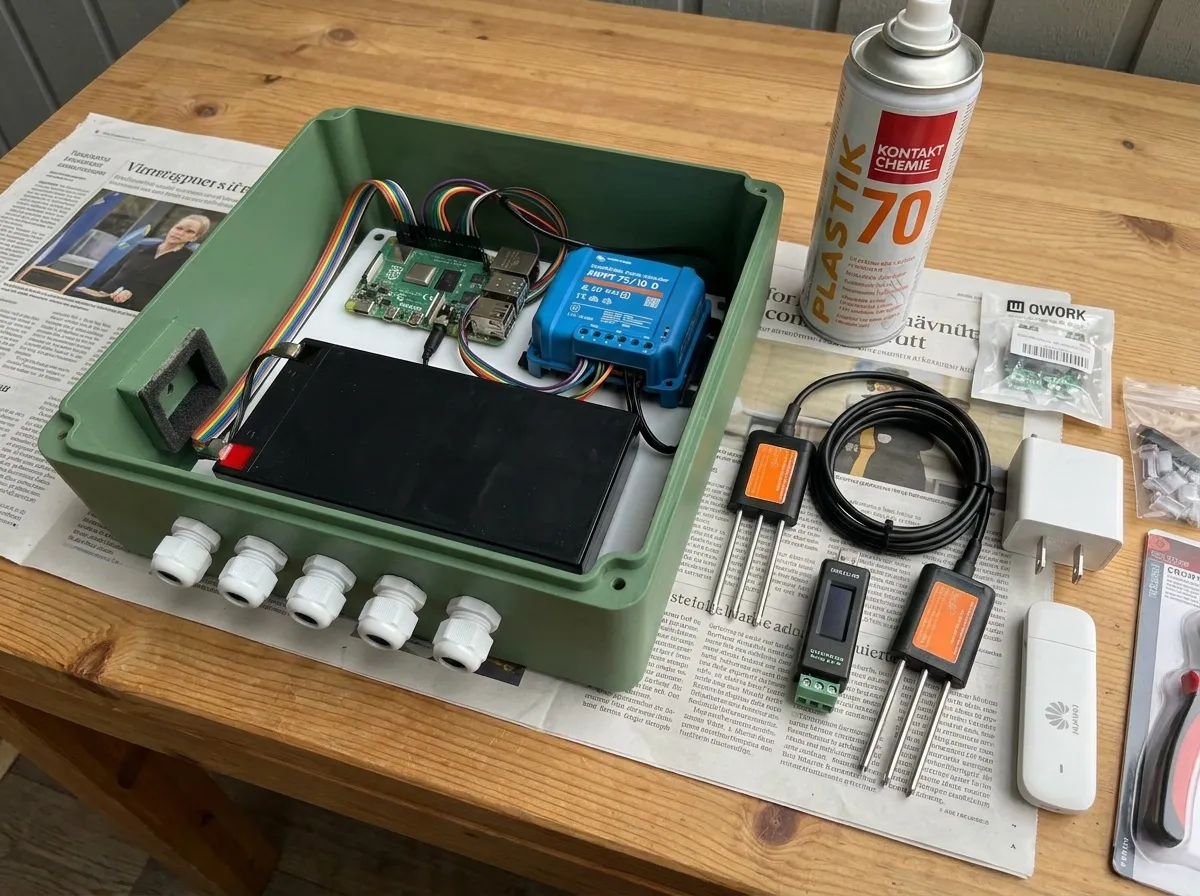
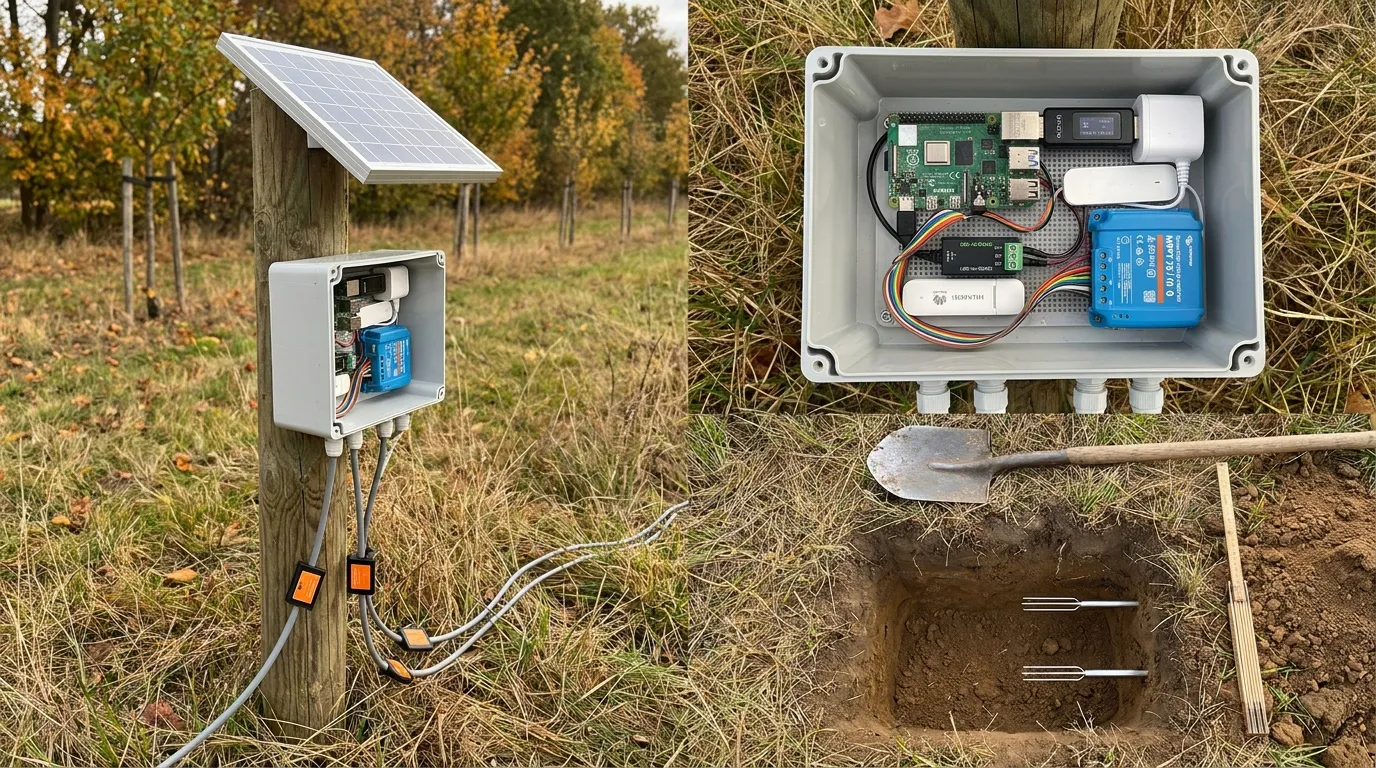
Rendered impression. Battery flat on the floor, glands pointing down, nothing metal near the 4G stick.
Leave the steel plate that came with the box out. Steel next to the 4G stick weakens its signal.
Cut the 3 mm plastic sheet to fit the inside of the box.
Lay the battery flat on the floor of the box first: it takes half the space and decides where the rest goes.
Mount the Pi with the Witty Pi, the RS485 adapter and the controller on the plastic sheet with the nylon standoffs. Keep the 4G stick as far from the battery as you can.
17Make the hole the microphone listens through
Drill a 5 mm hole in the side wall, at the height where the microphone will sit.
Stick the waterproof membrane over the hole on the inside.
Press the microphone board flat against the wall over the hole, with its small sound hole facing the wall, and fix it with a ring of foam tape. Any gap between board and wall whistles.
On the outside, glue the small cap with foam inside it over the hole, open side down, so rain and wind stay off.
18Five cable glands, all pointing down
Drill five holes in the bottom wall for the glands: one for the panel cable, two for the probe cables, one vented gland at the lowest point so the box can breathe, and one spare that stays closed. Tighten each gland around its cable until the cable cannot be pulled.
19Spray the boards
Cover the microphone's sound hole and every plug and socket with tape. Then spray the boards with a thin layer of the clear Plastik 70 lacquer, outside, and let it dry for an hour. It keeps damp air off the electronics for years. Take the tape off.
20Close it and hose it
Close the lid and let the box run for an hour.
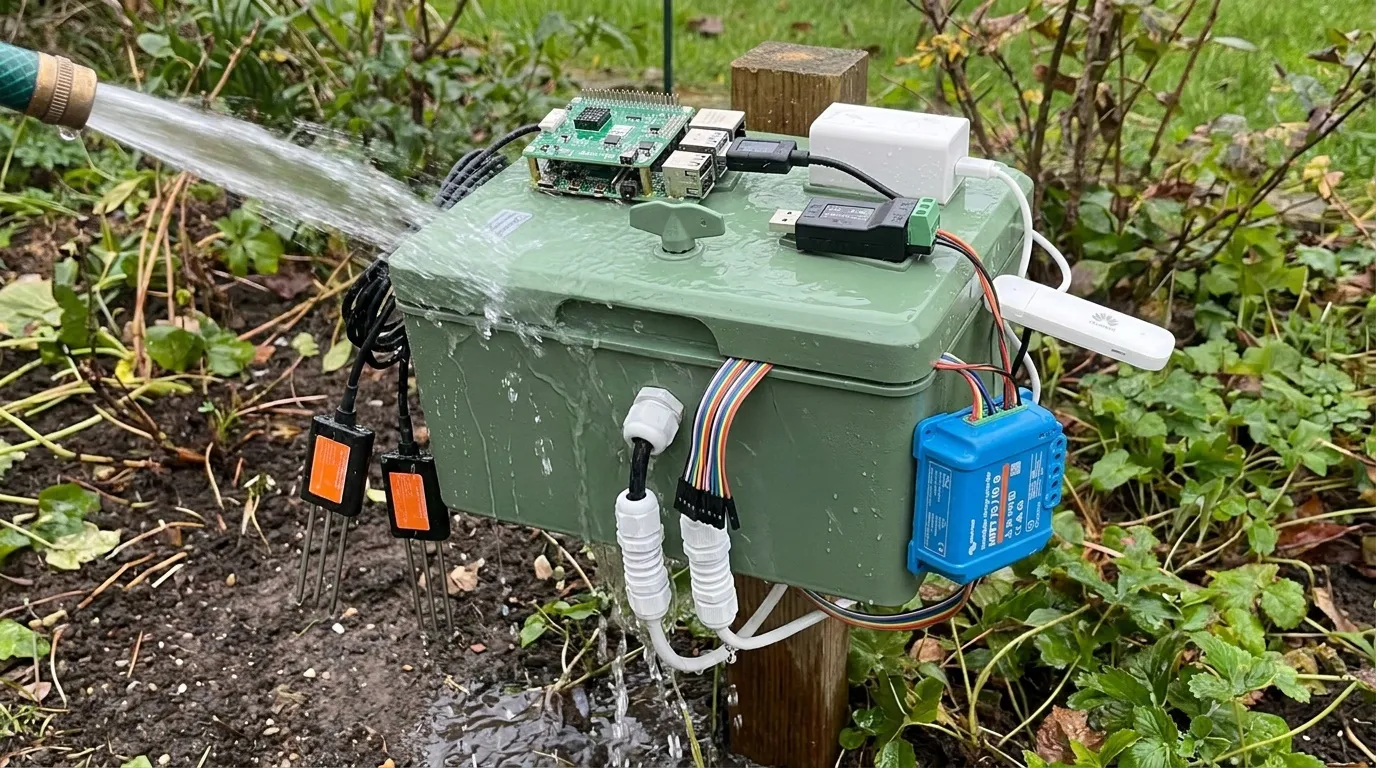
Then spray it with a garden hose for five minutes, from every side.
Open it and look for water. Any drop: find where it came in and seal that gland or seam again.
Rendered impression. Five minutes from every side, then open and look.
Check Dry inside after the hose, and on your box page 4G is still green with the lid closed. The 4G stick works through the plastic.
What you need for this part (11)
Enclosure: BOXEXPERT FLT 300200130 GR IP65 300x200x130 with steel mounting plate
Cable glands: M20 IP68 cable gland
consumables: ISO-PROFI heat shrink assortment 357 pcs 2:1 black + ERKO UV-resistant cable ties 200x3.6 mm 100 pcs
mounting: M2.5 screws and standoffs set, black nylon, 380 pieces
mic port: IP67 ePTFE acoustic membrane stickers, OD 10 mm / ID 6 mm, 50 pcs
mounting plate: 3 mm plastic sheet cut to the box
windscreen: open-cell foam microphone windscreen, glued over the port
conformal coating: Kontakt Chemie Plastik 70 acrylic protective lacquer, 400 ml
mic hood: small rigid cap over the mic port, foam inside, opening downward
paint: Matt green outdoor spray paint for plastic, 400 ml
tape: Poppstar self-amalgamating silicone tape, 25 mm x 3 m
Part 6 of 7
Into the ground
New software for the field, a post, the box at knee height, two probes a step and a half to the south.
21Make the field software
In the field there is no WiFi, and the box should listen on the network's schedule (from dawn and from sunset in summer, two hours from sunrise in winter) instead of fifteen minutes an hour. Both are set by the software.
On your box page, choose Another WiFi? Make new software for this box, leave both WiFi fields empty, and press the button.
Download it and put it on the memory card as before.
The box keeps its name and its history. The old card stops sending.
22Set the post
Rendered impression. Post 80 cm deep, box at 50 cm, probes 1.5 m to the south.
Choose a spot at the edge of a field or path, where machines do not drive. Mark it on the farmer's map.
Drive the 2 m post 80 cm into the ground.
Fix the box on the post at knee height (about 50 cm), on the side that gets the least sun.
Bolt the panel brackets through the post with the M8 bolts, panel facing south, above the box so it shades it. A panel is a sail in a storm: straps loosen, bolts do not.
23Put the probes in the soil
Dig a small pit, a bit wider than a spade, 1.5 m south of the post, where the panel's shadow never falls.
Push the 10 cm probe sideways into the untouched wall of the pit, at 10 cm deep. The 30 cm probe (the taped one) the same way at 30 cm. Push, never hammer.
Fill the pit with the soil in the order it came out, and press it firm. Air around the prongs reads dry for months.
Lead both cables to the box, through their glands.
24Switch it on and tell the box where it is
Put the card with the field software in, connect the battery, and tap the Witty Pi's button.
Standing next to the box with your phone, open your box page and press The box is here. That puts it on the map and starts the satellite reading of the place around it. Your exact location stays hidden: the public sees a circle of about a kilometre.
Check Within the hour, every light on your box page shows a fresh time. The morning after, Microphone shows the birds of the dawn chorus.
What you need for this part (2)
Solar panel: Victron BlueSolar 40 W 12 V mono
Post and mount: 2 m post, pressure-treated class 4, + 2 stainless hose clamps + M8 through-bolts for the panel brackets + cable lock + UV ties + spade
Part 7 of 7
Two weeks of watching
Look at the box page once a day and do not touch the box.
25Watch, do not touch
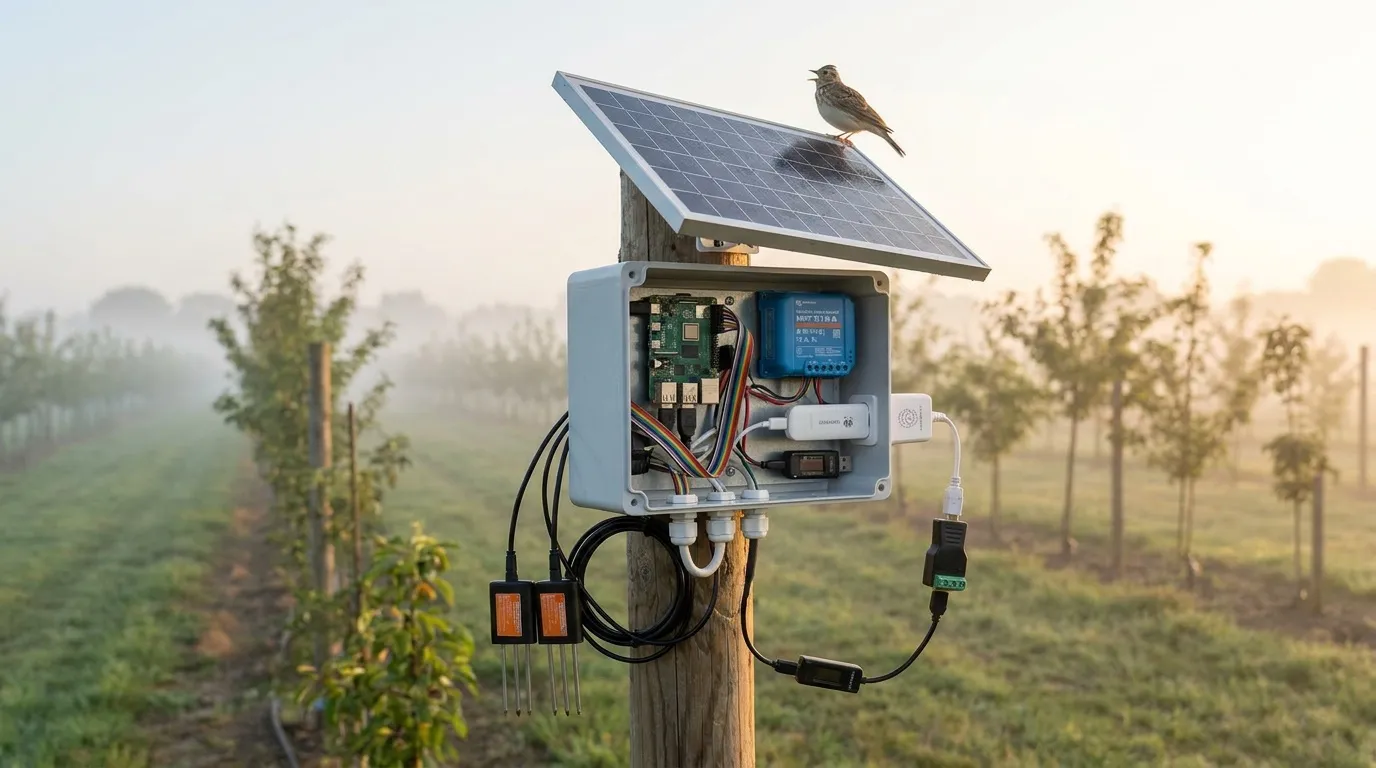
Rendered impression. The box earns trust by being boring for two weeks.
For two weeks, open your box page once a day and look at four things:
The box is on: a time from today.
Microphone: birds most mornings.
Soil probes: both report. After rain the moisture goes up, then slowly down.
The battery, in the Victron app when you pass by: above 12.5 V in the morning.
Do not open the box. Anything that needed a visit is worth knowing: write it in the feedback box at the bottom of this page, so the next builder does not run into it.
Check Fourteen days in which the box needed nothing from you. It now runs by itself.
The reasoning behind every choice is in the long build plan and on the kit page. Comfortable with a terminal? node/ in the repository is the software inside the box. Ideas for later go on the backlog.
How node 1 is going: the orders
Date
Shop
What
EUR
Status
2026-09-16
reichelt (DE)
enclosure, 5 glands, Victron MPPT 75/10
90.38
delivered
2026-09-16
UUGear (DE)
Witty Pi 4
45.08
delivered
2026-09-16
TelecomShop (NL)
Brovi E3372-325 4G stick
71.30
delivered
2026-09-16
Berrybase (DE)
Pi 4 2 GB, 2x SEN0600, card, mic, RS485, small parts
211.25
cancelled by Berrybase 2026-09-17
2026-09-22
1NCE
IoT Lifetime Flat SIM
shipped UPS 1Z1W4W526820825232
2026-09-24
Kiwi Electronics (NL)
Pi 4 4 GB, Waveshare USB-RS485, stacking header, nylon standoffs, ferrules + crimp pliers, Silicon Power 64 GB card
A note is shown here for everyone. An AI change is made to the plan straight away: an AI edits these pages (and the bench log), publishes, and writes back here what it did or why it held off. The maintainer then keeps the change or rolls it back.